Keyboard: e from Global menu.
(Advanced Users - See also Editing the emb.elt file.)
This module is purely to enable you to set up one or more embossers on your system, and to allow you to specify a default embosser for all new documents. If you wish to change the embosser or its settings for an individual document, (new or existing) you MUST do this in Document: Embosser Setup.
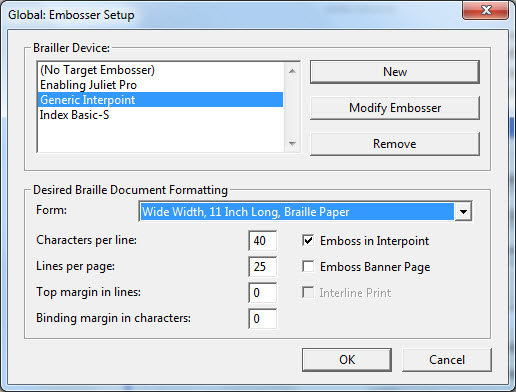
The Global: Embosser Setup dialog is used to tell DBT about your braille embosser. You must normally have at least one embosser (Brailler Device) set up on your system, but you may now have as many devices as you like. See Additional Notes at the end of this topic for more information.
Brailler Device: (Selection/List box) During the DBT installation process, you may have chosen to install one or more embossers. If so, they will appear in this list. If the list only contains "(No Target Embosser)", and you wish to set one up, tab to the "New" button, and press Enter.
New: This button will take you to the Embosser Setup: General Tab, which is one of three tabs where you may begin the setup process. (If you are setting up a new embosser, may we suggest you click on the above link now.)
** Modify Embosser: Before you click this button, please ensure that you have highlighted the embosser you wish to edit in the Braille Device selection list. This button will also take you to the Embosser Setup: General Tab.
** Remove: If you wish to remove an Embosser Device, please ensure it is highlighted in the Brailler Device list first, before pressing the "Remove" button. [Note: You cannot remove the "(No Target Embosser)" entry. ] You will be asked to confirm that you wish to remove the selected embosser as shown below. Press the "Yes" or "No" button as appropriate.

Note: If you remove any Brailler Device, DBT sets the Brailler Device to "(No Target Embosser)". In such circumstances, you will only have the Characters per line and Lines per page options available.
There are however limitations in so much as you may only select between 10 and 160 Characters per line, and between 4 and 40 Lines per page.
(** The "Modify Embosser" and "Remove" buttons will be disabled if a user will be unable to save changes to the configuration. So, restricted users in Windows XP will find that these buttons will often be disabled. In Vista, they will often be disabled if a user has not run DBT "As Administrator".)
Desired Braille Document Formatting - This section contains 8 controls. However, it is important to appreciate that entries here may be constrained by settings in the Global: Embosser Setup - Device Settings tab. For example, if you have set up a Top Margin of 2 in Device Settings, you cannot have a Top Margin of less than 2 in this section.
Characters per line: Enter your desired characters per line, excluding the binding margin.
Lines per page: Enter your desired lines per page, excluding the top margin.
Top margin in Lines: Enter your desired top margin in lines.
Binding margin in characters: Enter your desired margin in characters.
Now we have three check boxes which may or may not be grayed out. Availability of these items is controlled by capabilities of your selected embosser.
Emboss in Interpoint: This will only be available if your embosser supports Interpoint (or double-sided) embossing.
Banner Page: This is an additional page which is embossed at the beginning of each file your emboss giving basic file information.
Interline Print: This will only be available if your embosser supports Interline Printing or if you are using the TranSend SE
If you are satisfied with your changes, press the OK button. If you wish to abort this process and return to DBT, press the Cancel button.
Please note that pressing OK is this main dialog not only confirms any changes made to this dialog, but also any made to the General, Devices Settings and Advanced dialogs.
Take special care to ensure that you have highlighted the Brailler Device which you wish to be your default for any NEW documents created.
Additional Notes: Remember that DBT's files now contain "Sticky Document Information". In simple terms, when you save a file, it also saves a variety of details, such as your Brailler Device.
Templates also contain this "Sticky Document Information". If you commonly work with two or more paper sizes, we recommend that you generate a template for each paper size.