Fact 1. Most modern desktop and laptop computers do not have Parallel or Serial Ports.
Fact 2. Many embossers only have Parallel and/or Serial ports.
So how can you connect your Parallel/Serial embosser to your computer?
If you have a desktop PC, one of the simplest ways is to add a suitable expansion card which provides additional Parallel and/or Serial ports.
If you have a laptop PC, which has an available PCMCIA slot, there are cards available which will provide an appropriate port. A search at http://www.google.com (or your favorite internet search engine) for "Parallel PC Cards" or "Serial PC Cards" should provide a list of suppliers in your vicinity.
The alternative is to purchase a "USB to parallel cable". Once again, an Internet search should result in a wide choice of local suppliers.
In the following example, we have used a cable, Part Number A94BF, purchased from Maplin (http://www.maplin.co.uk). The installation process may vary with alternative makes and models, but in principal should be the same or similar. This example also uses Windows XP.
Follow the manufacturer's installation instructions to install the cable.
WARNING: This process is normally specific to a particular USB port, therefore you should chose a USB port which you will always use to connect your embosser.
You now need to "Add a Printer", which is done in the normal way in Windows. However, you should select "Local Printer", and specifically NOT ask Windows to automatically detect the printer.
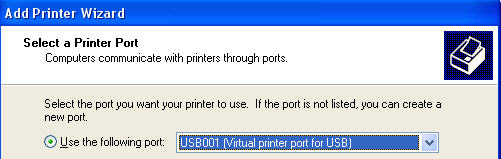
You will then be asked to select a printer port. From the drop down list of ports, look for "USB### (Virtual Printer Port for USB)", where ### will be a USB port number.
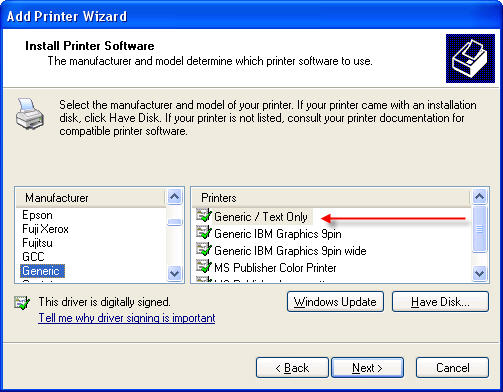
At the next dialog, you will be asked to select a printer. In this case, from the Manufacturer list select "Generic", and from Printers list select "Generic /Text Only" as shown below.
You will be asked to name your printer, and at this point, we suggest you enter something meaningful as we have shown below, by adding "(Brailler on USB Port)" to the name suggested by Windows.
Eventually the process will ask if you wish to print a test page. We suggest you answer "Yes" here. Provided you have selected the correct port. This will emboss about 2 pages of test data, and will prove the connection works. (Note: The print out will likely be in a form of Grade 0 braille.)
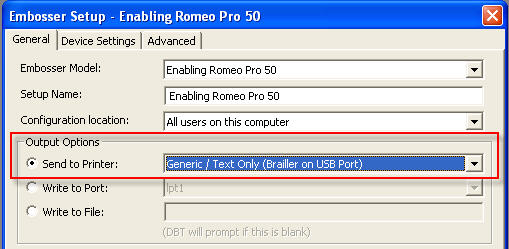
You are now ready to set your embosser up in DBT. The full instructions for setting up of a new embosser are covered in Global: Embosser Setup.
However there is one additional point to note - in the General Tab, Output Options section, you must select your newly installed printer.
We suggest you test the installation with a short document to ensure that you have correctly configured your embosser.