Document: Embosser Setup...

Keystroke: Ctrl + F11

Document: Embosser Setup is a new command in DBT version 10.5 onward. In earlier versions of DBT, all embosser setup was done through the Global: Embosser Setup menu. DBT stores Sticky Document Information, including embosser setup, with each document. This allows you to more easily work with documents intended for different paper sizes, for example. It also means that, if you are updating from a previous version of DBT, you should get used to using this dialog -- Document: Embosser Setup -- to manage embosser setup on a document-by-document-basis.

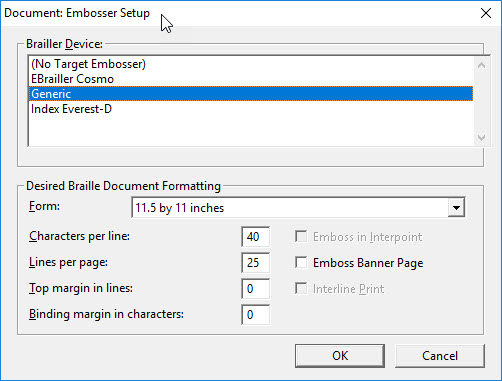
The Document: Embosser Setup dialog is shown below:

Image shows Document Embosser Setup dialog (As opposed to the Global: Embosser Setup)

This dialog is used to tell DBT how to format only the current document. If the document is a print document, the formatting specified here will be applied only when the document is translated to braille. (Users of earlier versions of DBT take note: changes made here will not affect other documents.) The formatting details you can specify include the number of lines per page and cells per line. If you have an embosser that supports multiple paper sizes, you can also specify which paper size should be used for this document. Furthermore, if you have more than one embosser, you can specify which one should be used when embossing this document. All of this will be stored as Sticky Document Information when you save this document.

  1. The first control is a list of installed embossers. The most important thing you should understand about this control is this: the current document will be embossed using whichever embosser is highlighted when you click OK to exit the dialog. If you have only one embosser, this is not usually a concern.
  2. A pull-down shows what forms, or paper sizes, are supported by your embosser. The name of the form you choose here is stored within the current document when the document is saved. So you can be sure that DBT will always format the document in a way that is appropriate for the form. (If you do not see the paper size you want, and you know that your embosser will support it, plus, you are not afraid of some technical work, see the on-line Help, Miscellaneous: Customizing the emb.elt File, to learn how to add a form.)
  3. Two edit controls allow you to specify how many characters per lines and lines per page. DBT automatically fills these in when you choose an embosser and paper size, but you can change the values.
  4. Two edit controls allow you to specify the top margin and Binding margin for this document. Note that the characters per line value given above is in addition to the binding margin, and the lines per page value given above is in addition to the top margin. See also Note below regarding other constraints.
  5. Three check boxes may allow you to enable or disable Embossing in Interpoint, Embossing a Banner Page , and Interline Print. Which of these options are available depends on the capabilities of your embosser. In some cases, enabling Embossing in Interpoint or Interline Print might reduce the number of lines that your embosser can fit on a page. DBT checks this for you.
  6. The OK button (or Enter) accepts all settings in the dialog and applies them to the current document only. If you have specified impossible values (e.g. 200 characters per line), then DBT corrects your values, tells you what has been corrected, and leaves the dialog opened for you to check investigate if you wish. If everything in the dialog is fine, then the dialog is closed. However, you may be warned if your document format is about to change; this is important because you may then want to to regenerate a Table of Contents.
  7. The Cancel button is used close the dialog without saving anything. (Note that neither document format changes nor embosser list changes are saved if you click Cancel.)

Read on to discover some ways that you can save time managing braille format settings for your documents, or read further on to learn about some things that may go wrong when you use Document: Embosser Setup.

Time-Saving Tip #1

Despite the many controls, you can often get through Document, Embosser Setup using just three steps:

  1. Select the embosser to which you want to send the current document.
  2. Select the form (paper size) on which you want to emboss the current document.
  3. Click OK (or hit Enter). DBT automatically sets up your document as is usually appropriate for the selected embosser and paper size.
Time-Saving Tip #2

Use Global: Embosser Setup to set up the document format you most commonly use. Then you will not have to visit Document: Embosser Setup at all, for most documents.

Time-Saving Tip #3

Perhaps Tip #1 is not working for you. You find that you cannot push OK directly after selecting a paper size because, for example, you wish to increase the binding margin and turn off Embossing in Interpoint. In this case, set everything the way you want it, make sure that its working by embossing the document. Then, create a Template from the document. The template will contain all the same Sticky Document Information as the current document. When creating new documents, or importing documents from other applications, you'll just need to select your custom template and you'll be all set.

Common Problems
Common Problem #1: Confusing Global: Embosser Setup and Document: Embosser Setup

If you have used versions of DBT earlier than 10.5, just keep in mind Document: Embosser Setup changes only the current document, while Global: Embosser Setup changes only the format of some documents yet to be created. (This is explained in detail in the help topic Global: Embosser Setup.)

Common Problem #2: Forgetting to use OK

Even if you bring up the dialog just to manage the list of embossers (perhaps to add a new embosser), you must push OK in the Document: Embosser Setup dialog itself, or everything you have done (e.g. the addition of the new embosser) will be lost.

Common Problem #3: Pushing OK too soon

If you bring up the dialog to manage the list of embossers you must also be careful to check everything in the Document: Embosser Setup dialog itself before you click OK. Otherwise, you might be applying formatting changes without intending to. Remember that clicking OK causes DBT to apply all changes to the list of embossers and to apply all changes shown in the Document: Embosser Setup dialog itself to the current document.