In the course of your work you may find it expedient to create some of your own custom formatting styles. You will probably want to save them and re-use them in other documents instead of recreating them each time, and the way to do that is by creating a custom template.
You begin by creating a new document and selecting the template that most closely matches your needs. If your language has only one supplied template, that template is your likely starting point. If your language has several templates, again, select the one that provides the best match. DBT Help provides a list of all the DBT standard templates, with links to their details.
You should now have a blank document on your screen. (This blank document has already incorporated the Global Printer and Embosser settings of your default ink printer, and your default braille embosser. These should ideally have been defined via Global: Printer Setup and Global: Embosser Setup. However, do not worry. They can be changed.)
Please note that from now on in your newly open document, you absolutely must make any changes to your Printer or Embosser setup using Document: Printer Setup or Document: Embosser Setup.
If you selected a template which uses one base language, but your custom template requires a different base language, now is the time to make this change. See the Document: Translation Tables menu to make your selection.
Note that there may be special considerations for languages depending on their context. For example, although you might wish to produce a document in Spanish or French, you must decide if you wish to present those languages as taught in an English School or as used in the native country. There is a difference in the braille rules applied.
Now would be a good time to save your template, as you do so, consider whether you wish to keep it as a kind of "master template" which you can call up later, and use to create other variations. (You may wish to name it accordingly.)
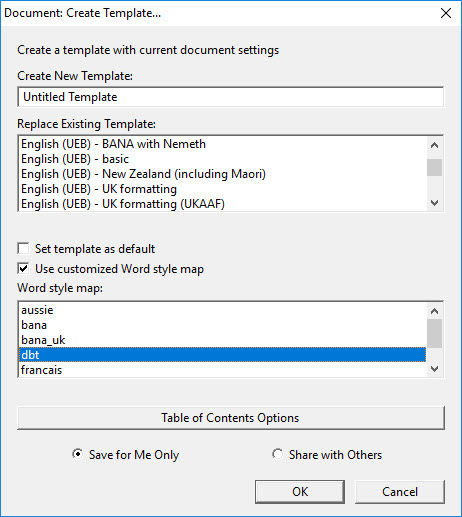
From the Document menu, select Create template. The following dialog will appear.

Note that this dialog provides two options: (1) Create New Template, or (2) Replace Existing Template. If you wish to "Create a new Template" type an appropriate name in the text box.
If you wish to "Replace an existing template", tab to the "Replace Existing Template" list box, and select the template to be replaced. Note that you can replace any custom template you have previously created, but you cannot replace the standard DBT templates.
Word Style Maps are files which provide a mapping from the styles in Microsoft Word to the styles defined in DBT when you import a file from Word. These files have a .mws file extension. If you have a customized Word style map you wish to use, check that box. (Setting up such a mapping for imported Word files is a major motivation for creating a custom template.)
Finally, click on OK, or press Enter.
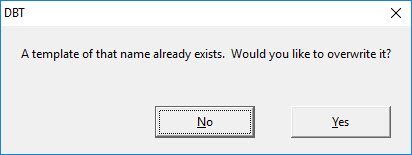
The following dialog appears for you to confirm the action if you are replacing an existing template.

Click the Yes or No button. If you press Enter, No is the default.
A custom template for your own use is normally saved in your own computer profile:
C:\Users\[your-user-name] \AppData\Roaming\Duxbury\DBT\Templates.
To save a custom template for all users of your PC, save it in:
C:\ProgramData\Duxbury\DBT\Templates.
Note: Drive "C:" is the normal files location on Windows, though your system may use a different "volume" for your files.