Some History: The original method for sending braille to the Interpoint Elekul 55 embosser used an Interpoint NV utility program called print55.exe. DBT output ".p55" format files for that program. However, that method no longer worked once Windows began running 64-bit versions of their operating system.
An interim method used WPRINT55, which was a shortcut to a Windows utility. For this, DBT version 11.2 SR3 produced .x55 files.
Current Practice: The current method is similar to the original one, updated for 64-bit systems. A key element is that output for the Interpoint 55 must be set to "Write to File". DBT produces ".ebf" files, and these are sent to an updated Interpoint print55 driver to run the embosser.
The software manual for the Interpoint 55, as well as any software updates, can be obtained from the vendor.
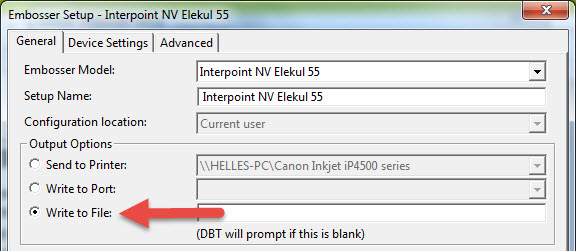
Important Note: When setting up this embosser in Global: Embosser Setup, ensure you select the "Write to File" radio button under Output Options as shown below. (For full details about adding an embosser, see "The Menus: Global: Embosser Setup".)

General Advice about Computer Ports: Serial, Parallel, USB, and Network
The Interpoint 55 has a serial port. Use a straight through cable to connect the PC with the embosser.
The recommended baud rate is 19200 baud. Set this with a dip switch on the embosser. The Elekul software "handshaking" is always set for 8 data bits, 1 stop bit, and no parity. There are special parameters for the serial connection which are set by the emb.elt file.
Additional Notes on the Elekul 55
The main way that DBT figures out how to send data to the embosser is a file called EMB.ELT. For the Interpoint 55. you will see a long list of different forms. Each form can be thought of as a different size of paper.
Each of the form names in the EMB.ELT file for the Interpoint 55 is associated with a different Interpoint55.ini file. For example, if you had a new .ini file you wanted to support called FRED.INI. You need to add a new line in the EMB.ELT file using the form name: FRED. Make sure the file FRED.INI is in the DBT subdirectory DRIVERS\PRINT55 (such as C:\DUXBURY\DRIVERS\PRINT55).
Issues in Creating INI files
The Interpoint NV company recommends using PRINT55 as a means of creating the .INI files. We used a batch file. Here is part of it:
print55 @11_w.ini /DS /CPL:41 /LPP:31 /TM:0 /LM:2 /RM:1 /FOLD:0 /MIR:0 /INI
print55 @11_n.ini /DS /CPL:30 /LPP:31 /TM:0 /LM:2 /RM:1 /FOLD:0 /MIR:0 /INI
print55 @11_d.ini /DS4 /CPL:41 /LPP:31 /TM:0 /LM:2 /RM:1 /FOLD /MIR /INI
print55 @11_nd.ini /DS4 /CPL:30 /LPP:31 /TM:0 /LM:2 /RM:1 /FOLD /MIR /INI
Once the print55 program reads in a .INI file. makes corrections from the command line and then saves the results. it always puts in the full path name of the table file. This can interfere with DBT. You probably want to be able to copy all the files in the PRINT55 directory to different places. depending on how you install the software. We carefully remove the full path (leaving the directory name) in the supplied .INI files. We recommend you do the same. After print55 has modified the files. edit them (or use a global replace program) to just leave the file name.
You will notice that all of the .INI files use the USA1_6 conversion table. This just means that this is the way that DBT communicates with the Interpoint 55. If you are doing Spanish braille in DBT. DBT will encode the material correctly so that you get Spanish braille on the Interpoint 55. For this to happen. leave all the tables with USA1_6. Using a different encoding table will cause scrambled braille.
You will notice that the tables are a bit imprecise about the form length. The form length of Interpoint 55 output is determined by the width of the paper rolls. Once you know how many lines you want. tell DBT what the maximum is. For the sake of convenience. we tell the Interpoint 55 to be able to output to the maximum dimensions.
The width is more critical. because that determines how the paper is cut. Changing the margins and the embossing width of the output is a real reason to create your own .INI files. Add the margins to the carriage width to get the total number of characters. For wide paper. we use 44 characters. Each character is 16 steps on the motor. each step is .3927mm when the roller is new. Thus. the carriage width is 704 steps or 276.44 mm (10.8 inches). The number for narrow paper works out to 8.16 inches. These widths may be up to 3% less if the roller is worn down in need of replacement.
Documentation supplied by Interpoint NV on command line syntax:
Syntax for Print55 program used by the Interpoint 55 double sided Braille embosser.
Syntax:
Print55 [filename(s)] /? /H /V /VERSO /RECTO /DS /DS4:n /FOLD:n /RAW
/INI /LM:n /RM:n /TM:n /CPL:n /LPP:n /TAB:filename /MIR
/COMn:baud.word.stop.parity /LPTn /FILE:filename /X:n /SL:n
/DIS:n /SKIP:n.m /VSHIFT:n /BIND:n.o.w /ELE03:n /BATCH:n
@file.ini -list.ext
[filename(s)] : Filename. use complete path names. wild cards allowed
/? /H : this help screen
/V : Verbose: give detailed information
/VERSO : Single sided. verso
/RECTO : Single sided. recto
/DS : Double sided. single pages
/DS4 : Double sided. quires (magazine style)
/DS4:n : Double sided. quires with n pages (book style)
/FOLD(:n) : Adds fold (dots) in middle of double sided pages>
(/FOLD = On. /FOLD:0 = Off)
/RAW : Send directly to output port
/INI : Save settings in PRINT55.INI
/LM:n : Left margin. n characters wide
/RM:n : Right margin. n characters wide
/TM:n : Top margin. n characters wide
/CPL:n : n characters per line
/LPP:n : n lines per page
/TAB:filename : Conversion table. (use full path names)
/MIR(:n) : Mirror margins (only applies for DS4) (/MIR:0 = Off)
/COMn:b.w.s.p : Print to serial port (E.g.: /COM1:19200.8.1.N)
/LPTn : Print to parallel port (E.g.: LPT3)
/FILE:filename : Print to file (use full path names)
/X:n : Number of copies
/DIS(:n) : Disable embosser between multiple texts (/DIS:0 = Off)
/SL:n : Screen lines (E.g.: /SL:25. /SL:43. /SL:50)
/SKIP:n.m : Insert m empty text lines at line n.
Can be used to fold the text.
/VSHIFT:n : Shift page vertically by n dot rows
(default 0. maximum 3)
/BIND:n.o.w : Add binding relief: offset from left margin=o dot cols
width=w dot cols
(/BIND:1.0.3 = On. Offset:0. width:3. /BIND:0 = Off)
/ELE03(:n) : Interprete input text as ELE03 embosser data
(/ELE03 = On. /ELE03:0 = Off)
/BATCH(:n) : Batch processing (program does not wait for key press)
(/BATCH = On. /BATCH:0 = Off)
@name : Use alternate ini file to load/save initial values
By default Print55.ini will be used.
File must reside in print55 directory.
-list.ext : ASCII file that contains a list of files to be printed
Each line in the file contains the name of a single file
to be printed. Options may also be included: only one
option per line. Lines preceeded by a ; are ignored.
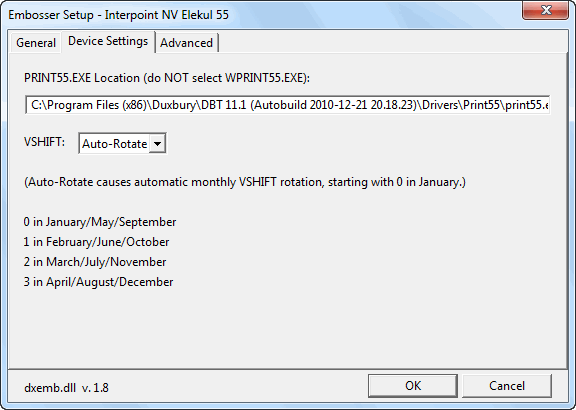
DBT's handling of the Interpoint 55, high-volume, production embosser has been upgraded significantly since its introduction with the release of DBT 10.6. The current DBT supports the Interpoint fully, including the VSHIFT option, designed to even out wear on the Interpoint 55's embossing pins.
VSHIFT is a value in the range 0-3 that specifies how much to shift the top of the page down. VSHIFT is not used to create a top margin. Instead, due to the unique design of the Interpoint 55, a change in VSHIFT causes a different set of embossing pins to be used. So, Interpoint recommends rotation of VSHIFT values on a monthly basis to ensure even wear on the embosser parts, and a particular VSHIFT value may be used to avoid use of a broken pin if necessary.
DBT normally manages VSHIFT values automatically, setting the VSHIFT value to one that depends on the calendar month, as shown in the following table:
| Month | VSHIFT |
|---|---|
| January | 0 |
| February | 1 |
| March | 2 |
| April | 3 |
| May | 0 |
| June | 1 |
| July | 2 |
| August | 3 |
| September | 0 |
| October | 1 |
| November | 2 |
| December | 3 |
Automatic rotation is illustrated below. To change this automatic rotation, for example to set a specific VSHIFT value that will avoid use of a broken pin, select Modify Embosser from the Global Embosser Setup dialog. In the Device Settings tab of this dialog, change the VSHIFT value from Auto-Rotate to 0, 1, 2, or 3 (according to where the broken pin is located). Use the same dialog to resume the regular rotation after the pin is repaired.