When you select the Advanced tab of the Embosser Setup dialog, the expert-level controls appear.
With the vast majority of Brailler Devices, you will not need to make any changes in this dialog unless specifically advised by either Duxbury Systems or your embosser manufacturer. However, if you are faced with a device which is unlisted or unknown to
First, do not make changes in this dialog lightly. Be sure of what you are doing.
Second, as a safeguard, you may want to record the current settings on this dialog before attempting any changes, in case you need to recover quickly from an unexpected result.
Return to Global Embosser Topic
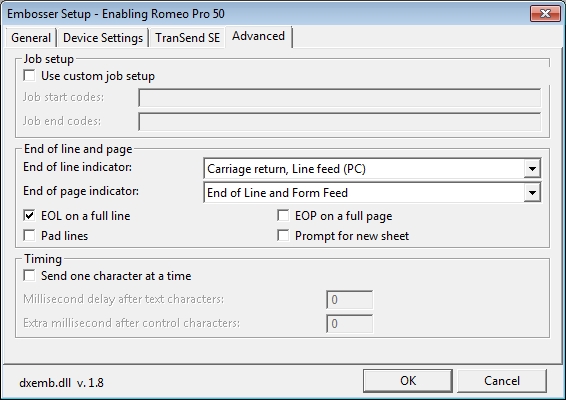
Job Setup - This section handles start and end codes. Checking the "Use custom job setup" check box enables the "Job start codes" and "Job end codes" fields.
Job start codes: Text that you type here will be sent to the embosser after any setup sequence (e.g. escape codes) that the program normally sends when starting to emboss. The additional codes that you add to the setup sequence may be used for any purpose. However, avoid using this feature to redefine the form size, the braille cell size, or the interline spacing of the braille. Any change to these settings will not be read before output time, and so
Job end codes: Text that you type here will be sent to the embosser before any job-ending sequence (e.g. escape codes) that the program sends on its own. Text may contain the same ASCII printable characters and special sequences as Job start codes. Job end codes are often left blank even when Job start codes are used.
As examples, a user of the Gemini embosser might enter <esc><esc>Q to enable double-sized interline print or <esc><esc>D to enable double-striking of the braille. Note that neither of these changes affects the form size or the layout of the braille on the form.
End of line and page - The options in this section control what device Control Codes are produced at the ends of lines and pages.
End of line indicator: Normally the program will send a CR/LF Control Code at the end of each line. However, if you have opted to Write to file, with a view to processing that file on a non-Windows system or non-Duxbury application, you may make an appropriate selection here.
End of page indicator: As with End of Line indicators, you may select an option here to meet special needs.
EOL on a full line: Check this box if you wish to add an End of Line Code even when the line contains as many braille cells as the embosser will support. Many embossers automatically skip to the beginning of the next line in this circumstance, so it can be important to leave this option un-checked.
EOP on a full page: Check this box if you wish to add an End of Page Code even when all possible lines contain braille. Many embossers automatically skip to the top of the next page in this circumstance, so it can be important to leave this option un-checked.
Pad lines: Some devices need to see at least a few characters on each line. Checking this box will cause spaces to be added at the end of any lines that are blank or very short.
Prompt for new sheet (a.k.a, Prompt on new page): Checking this box causes output to pause after each page has been sent to the Braille Device. This can be useful if you have to feed each page of material manually into the device.
Timing: This section is highly technical, but basically it controls how long output waits after sending a text character or control character. It is enabled only when "Write to port" is selected on the General tab.