
Note: These instructions were originally written for Word 2003. AutoText remains a Word feature, but the details of the user interface controls may change from one version of Word to the next.
There are a couple of issues to keep in mind before you start.
1) Decide if you want the AutoText entries in a specific Word template other than normal.dot. The simple way of creating AutoText entries will automatically include them in your normal.dot template even if you are working in a different template at the time.
2) Activate the AutoText toolbar by going to Word's View menu, Toolbars, and checking "AutoText". An additional Toolbar will appear as shown below. (In later versions of Word you may have to find the AutoText controls and add them to a ribbon in your toolbar.)
Now take a look at the drop down list.

You can specify a category for your entries based on the paragraph style you use when first setting this up (described below). If you don’t create a special category, it will likely end up in a Normal category (if Normal is the paragraph style you are using during the process).
If you are using a special template, use that template while creating the AutoText entries. Our recommendation is to type in all the DBT codes you want to include first. (Suggestion: Additionally create an “empty” code, [[*__*]]. The __ can easily be replaced with a code not included in the AutoText entries.)
Also format them as you desire … using a character style with hidden text and a special color is the suggested approach. To have all the codes appear in a single AutoText category other than the current paragraph style name, select all of your codes and then create a new paragraph style by pressing Ctrl-Shift-S and typing the name you want (such as Codes, DBT, Braille, etc.) … this is the category where the AutoText entries will be placed. (See example below)
Now you are ready to begin adding the codes to AutoText. For best results, make sure you have non-printing characters turned ON.
1. Select the first code. DO NOT include spaces or paragraph marks. If you include the paragraph mark, the entry will be inserted as a separate paragraph.
2. To add to normal.dot: Press Alt-F3. The Create AutoText box will pop up with the code inserted. It is suggested that you change this to a meaningful name.
![Image shows the AutoText dialog with an entry of [[*lng~fr*]](../Resources/Images/working_with_word/autotext_create.jpg "The AutoText dialog with an entry of [[*lng~fr*]")
Press Enter. It’s now included in the AutoText list. If you have your AutoText Toolbar still active, you’ll see that it is assigned to the category based on whatever the paragraph style was used for your entry. Continue this procedure for the rest of your codes.
3. To add to specific template: After selecting the code, go to Insert | AutoText | AutoText. Select your template in the Look in drop down. Make sure you have renamed the entry if desired. Click Add. Now it is only added to that template. Continue this procedure for the rest of your codes.
The following is an example of a relatively simple set of AutoText entries which might be used by a British school to produce English & French.

Points to note:
Entries were typed first and as shown. Formatting was applied afterwards. Note the space after the code. Descriptions may be added if desired.
BEFORE starting to enter Autotext entries, a Word Paragraph Style called "Braille" was created, based on Word's "Normal" Style. This was then applied to the whole document.
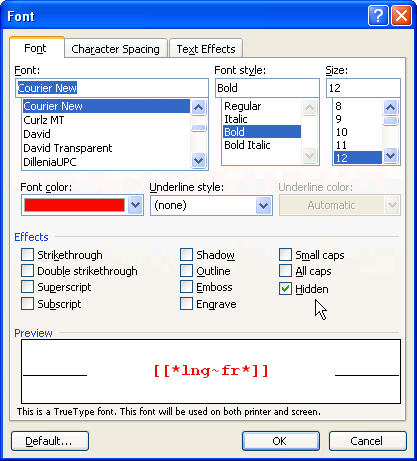
Next, a word Character Style was created (We called it "Braille Code"). In this example, we have chosen a 12 point Courier New Bold Font, colored red to make it stand out in our text. We have also checked "Hidden" under Font effects. (Click here to see Word's Format: Font dialog for this example.)
Finally the "Braille Code" Character Style was applied to the Codes themselves.
The following describes further optional refinements.
Place AutoText Entries on a Menu
You can add a menu to a current toolbar, or create a new toolbar and add menus to that.
New Toolbar: Right click toolbar area and select Customize (OR go to View | Toolbars | Customize OR go to Tools | Customize). On the Toolbars tab, click New. Give the toolbar a name and select the template if you want it in a different template than normal.dot (presumably you are working with a document using that template) … and then click OK. The new toolbar will probably be floating next to the dialog box. You can leave it there for now or drag it to the toolbar area.
New Menu: You’re still working in the Customize dialog, but now choose the Commands tab. If you are working in a specific template, make sure you choose it from the Save in drop down. At the bottom of the Categories list on the left is New Menu. Select that and you’ll see New Menu pops into the Commands list on the right. Click on New Menu in the Commands list and drag it to the toolbar of choice. That will put a new entry on the toolbar called New Menu with a drop down arrow. New Menu will be enclosed in a black outline … right click on it and give it a new name. If you want to access it using a hotkey, put & in front of the letter of choice. It’s nicer if you can choose a letter not already used with other menus but that’s not always easy.
The Customize dialog MUST stay open throughout this entire process, as it’s the only way you can create and modify the menus.
To add AutoText entries to the menu: Go back to the Commands tab in the Customize dialog, and look for AutoText towards the bottom of the Categories list. Select that. All the AutoText entries will be listed in the Commands list. Select the entry you want and then drag it to the new menu. The first entry may be a little tricky, but you need to get a small box to expand from the bottom of the menu, and then drop the AutoText entry. Once again, you can right click on it and modify the name or add the & to a letter if you wish.
Shortcut Keystrokes: To assign keystrokes to any or all of your AutoText entries, click the Keyboard button at the bottom of the Commands tab. If you are working with a special template, select it in the Save changes to drop down. Now choose AutoText from the Categories list and then the specific entry from the Commands list. Try various keystrokes in the Press new shortcut key box until you find one that’s not assigned (or one you don’t mind reassigning from a feature you don’t use). Click Assign. After shortcut keystrokes are assigned, you’ll see them listed in your new menu. If you don’t see the shortcuts listed on your menu, go to the Options tab on your Customize dialog and make sure Show ScreenTips on toolbars and Show Shortcut keys in ScreenTips are checked.
Before you exit Word, you will likely be prompted about saving changes to your template. Obviously you want to agree.