
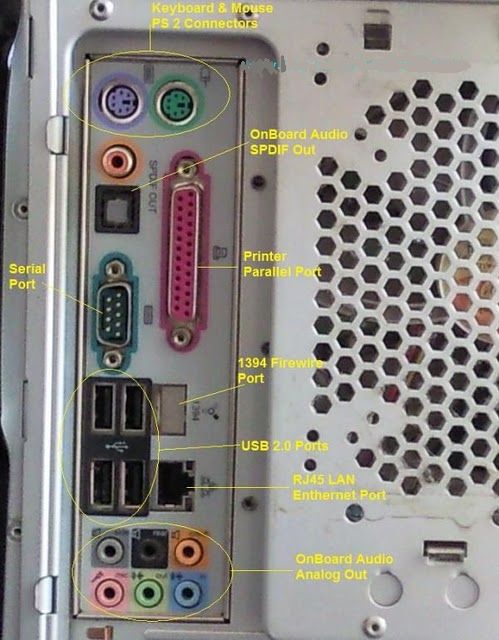
Some embossers have only serial ports, some have only parallel ports, and some have both. Some have USB ports, some have network (RJ-45) ports. It can be confusing to look at the back of a computer. Here is a quick guide to the different connectors:
LPT1.
If there is a second parallel port, it is called LPT2.
(Text and graphics by George Bell)
Fact 1: Most PCs and laptops these days do not have Parallel or Serial Ports
Fact 2: Many embossers only have Parallel and/or Serial ports.
So how can you connect your Parallel/Serial embosser to your computer?
If you have a desktop PC, one of the simplest ways is to add a suitable expansion card which provides additional Parallel and/or Serial ports. A search at http://www.google.com (or your favorite search engine) for "Parallel PC Cards" or "Serial PC Cards" should provide a list of suppliers in your country.
The alternative is to purchase a "USB to Parallel Cable". Once again, and Internet search should result in a wide choice of local suppliers. The installation process may vary with alternative makes and models, but in principal should be the same or similar.
Follow the manufacturer's installation instructions to install the cable.
(WARNING: This process is normally specific to a particular USB port, therefore you should chose a USB port which you will always use to connect your embosser.
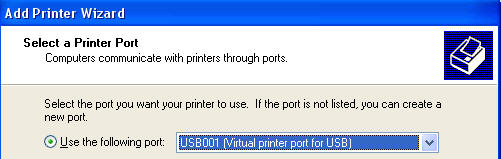
You now need to "Add a Printer", which is done in the normal way in Windows XP. However, you should select "Local Printer", and specifically NOT ask Windows to automatically detect the printer.
You will then be asked to select a printer port. From the drop down list of ports, look for "USB### (Virtual Printer Port for USB)", where ### will be a USB port number. The highest numbers work best
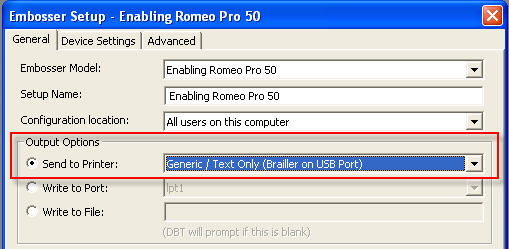
At the next dialog, you will be asked to select a printer. In this case, from the Manufacturer list select "Generic", and from Printers list select "Generic /Text Only" as shown below.

You will be asked to name your printer, and at this point, we suggest you enter something meaningful as we have shown below, by adding "(Brailler on USB Port)" to the name suggested by Windows.
Eventually the process will ask if you wish to print a test page. We suggest you answer "Yes" here. Provided you have selected the correct port. This will emboss about 2 pages of test data, and will prove the connection works. (The print out will not necessarily make sense, as it will be in a form of Grade 0 braille)
You are now ready to set your embosser up in Embossit.
However there is one additional point to note - in the General Tab, Output Options section, you must select your newly installed printer.
We suggest you now test the installation with a short document to ensure that you have correctly configured your embosser.
MegaDots Note

When creating an Embossit Configuration for MegaDots, the Setup Name (the second line of this form), should be MegaDots, MegaDots2, or MegaDots3 (depending on your the name of your MegaDots Embosser Configuration: MBOS, MBS2, or MBS3).
First the good news: most embossers with serial ports come with a serial cable supplied by the vendor or the dealer. The bad news is that if you need to get your own cable, there are a number of different forms of serial cables
For many embossers, the jack on the embosser uses 25 pins. Almost all Index embossers use 9 pins Some embossers have male jacks, and some have female jacks. Serial cables come in two major flavors: straight through, and null modem. In a straight through cable, pins 1-7 and 20 on one side are connected to pins 1-7 on the other side (i.e. 1 to 1, 2 to 2, 3 to 3, 4 to 4, 5 to 5, 6 to 6, 7 to 7, and 20 to 20). With a null modem cable, many of these pairs are swapped.
Unfortunately, there is no agreement as to the wiring diagram for a null modem. Usually you take a length of straight through cable and add a null modem adapter. A null modem adapter is a small adapter with a male jack and a female jack which swaps the appropriate wires. These are available from Radio Shack and many other vendors.
When you use a serial connection, the settings of several serial parameters must be the same on the computer's serial port and on the embosser, to avoid getting garbage data. We recommend setting the embosser for 9600 baud, no parity, 8 data bits, and 1 stop bit.
It is necessary to set the flow control (handshaking) in the Windows Control Panel (System, Device Manager, COM port properties, Ports Tab, Flow Control) to match the embosser and the Duxbury Embossing Module's embosser configuration. Remember that "handshaking" is the same as "flow control", and that "software handshaking" is the same as "Xon/Xoff"
If you are using hardware handshaking, set hardware handshaking in all three places: the embosser, the Duxbury Embossing Module, and the Windows Control Panel. If you are using software handshaking, set hardware handshaking in all three places: the embosser, the Duxbury Embossing Module, and the Windows Control Panel.
First the good news: except for the Ohtsuki, there is only one kind of parallel cable. The bad news is that sometimes parallel cables have a glitch and do not work. If you are having a problem, get another parallel cable to try out. Avoid long parallel cables at all costs. Never attempt to use a long parallel cable to keep an embosser in a distant closet for noise reduction.
There are several different methods to describe the way the computer treats parallel output. Unfortunately, each computer gives different names to these modes. The other issue is that these modes are set in the computer BIOS, which is never accessible through speech.
To find out how your parallel port is set you need to get into the BIOS. The BIOS settings are very basic parameters that control your hardware. You have to get into a separate "BIOS SETUP PROGRAM" before the computer is fulling booted into Windows. To get into your BIOS settings, you need know the correct key to hold down as you boot up the computer. Usually this is <del> F1, or F10. As your computer boots up, it will briefly display on the screen what you need to do to get into the BIOS settings. Hold down that key and figure out how to navigate the BIOS Setup program. We cannot offer any help, since each computer is a little different.
The parallel port is labeled LPT1 (or in rare cases, LPT2 if you are using a second parallel port).
Here is a list of good modes for embossers:
Here is a list of bad modes for embossers:
Once you exit the BIOS settings, do so in a way that keeps your changes.
If you have a computer network, it is desirable to have an embosser be available to all those on the network. How this is done depends on your network. Thus, we cannot offer any simple advice that works for everyone. Virtually all embossers need to be set up as Generic /Text Only Windows printers. This means that the characters that the embossing software decides to output will be the ones the embosser receives. You do not want the Windows software to add or subtract any characters.
The Tiger embossers depend on the Windows operating system to control the placement of embossed material. The Viewpoint software does a good job of installing the needed resources. The point here is not to expect that these drivers will be set up as Generic / Text Only printers.
The latest Index embossers have RJ-45 network ports. The default is for the embosser to obtain an IP address from the Server - with a non-expiring lease. If you don't wish to use that address, and prefer a Static IP address, the Index Embosser Utility can be used to give a Static IP.
After that, installation proceeds as for any networked printer. Each PC wishing to use that networked printer must have appropriate drivers installed. This is normal Windows Server practice. The driver file called be obtained from Index in Sweden.