
Before reading this topic, be sure that you've read and understood the instructions for Simple Installation. That topic includes full instructions for the simplest (and most common) type of DBT installation. This topic, in contrast, doesn't give full instructions for a more complex installation, but simply explains how to modify the Simple Installation steps to customize your installation.
There are three different ways to modify the Simple Installation instructions covered here. You can easily elect to:
Each of these customizations is covered in a separate section below.
If this is all you want to do, the first thing to do is reconsider. The Simple Installation procedure in fact installs all or nearly all features anyhow. The only feature you're likely to miss this way are the French Braille Fonts, which are not generally of interest outside of French-speaking nations.
However, if you want to be absolutely certain that everything is installed, then simply click Complete, or type Alt+C, when you see this screen (in step 4 of the Simple Installation instructions):
The remainder of the installation proceeds just as it does in the Simple Installation instructions.
Note: If you want to install all features and change the installation or activation storage directory, then you must instead follow the steps below for Customization 4: Customize what features are installed, then simply elect to install each and every feature. This is necessary because you can modify the installation directories only if you select Custom in the dialog shown above.
Most of the files that the installer puts on your system are placed into a single folder, typically C:\Program Files\Duxbury Systems, Inc.\DBT 11.1 SR3. If the default location for this folder doesn't suit you, you can change it.
First, when you see the dialog shown above (in step 4 of the Simple Installation instructions), you must click Custom, or type Alt+S, before clicking Next, or typing Alt+N or Enter. By doing this, you cause the installer to insert two extra dialogs in the installation sequence.
Note: If you don't alter any of the settings in either of these two installation dialogs, then the result is exactly the same as if you'd followed the Simple Installation instructions without elaboration. That is, the result is a "Typical" installation.
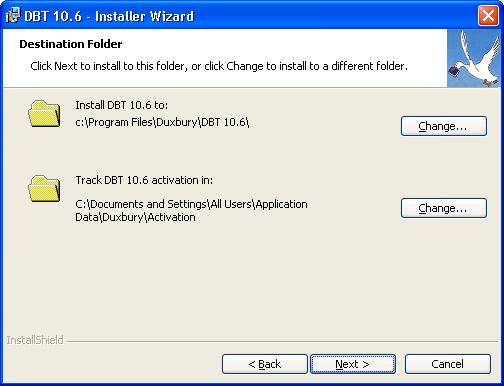
The first extra dialog, which allows you to change where the software is installed, is shown here:
If you want to change where the software is installed, click on the first Change button, or type the Tab key until you reach it, then strike the Spacebar. You will then see a dialog like this one:
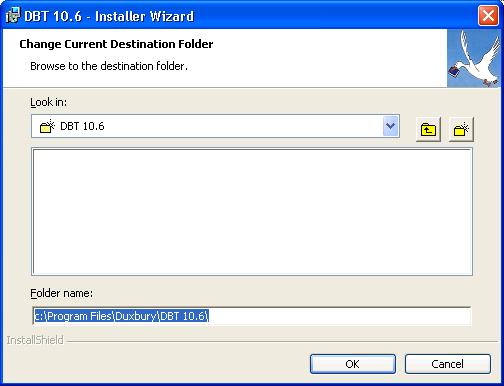
If you wish, you can use the drop-down list at the top of the dialog to review the name of the current destination folder, and see the hierarchy of folders in which it will be created. (Note: the radiating lines shown in the folder icon to the left of "DBT 10.6" in the image shown above indicate that this will be a new folder.)
You can also use the Parent Folder and Create New Folder tool buttons that appear to the right of the drop-down list.
However, it may be simplest just to use the editable text control near the bottom of the dialog. This shows, as plain text, the full path to the folder proposed as a destination for DBT 11.1 SR3. In our example above, this control contains the text "c:\Program Files\Duxbury\DBT 10.6". This text is also highlighted in the example shown above, which indicates that it is selected. This is the way the dialog first appears. So be careful when the dialog first appears, because any text that you type will replace the entire proposed destination path. We recommend using an arrow key, or perhaps the Home key, if you just want to change the drive letter, before you start editing the text of this control. (Note: If you make a mistake, just press Escape, or click the Cancel button, then push Spacebar again, or re-click the Change button in the Destination Folder dialog, to return to this dialog.)
The path that you specify does not need to exist. The installer will create the destination folder for you, as well as any parent folders as required. However, you do need to have sufficient operating privileges on this computer in order to create these folders.
When you have finished modifying the destination folder, click the OK button or type Enter. You will be returned to the Destination Folder dialog, which will now be updated to reflect the new Destination Folder you specified. Click Next, or type Alt+N, to continue. Or, if you wish to change the folder for DBT's Activation files, then read the next section.
Note: While the Change Destination Folder dialog remains active, the Installer periodically checks to be sure that you're specifying a valid location — either an existing folder to which you can write files, or a path that you can create. It also checks this when you click OK to dismiss the dialog. If the path isn't valid, the installer might pop up an error message like this one:
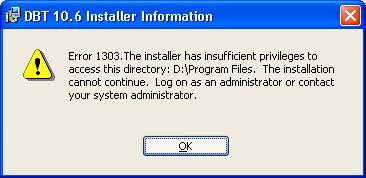
You can dismiss any such error message easily enough by clicking OK or pressing Enter. The Installer may or may not then immediately "fix" your mistake by resetting the text of the Folder Name to be what it was when the dialog first appeared. Watch out for that.
DBT needs to store several files on your hard drive to determine whether it has been activated. There are seven such files, in two subdirectories of one master activation directory. DBT normally places the Activation directory at C:\Documents and Settings\All Users\Application Data\Duxbury\Activation, for Windows XP systems, or in the corresponding "All User Application Data" location for other systems. This is to ensure that the files will be in a place where all DBT users can read and write them. The program files may be stored in a location that is read-only for the end user, but the activation files must be writable by any person running DBT.
If you need to change the location of the Activation files, follow the procedures as outlined above for changing where the software is installed, but use the second Change button in the Destination Folder dialog instead of the first. Be sure that you specify a location that your end users can read and write.
Note: If you make this change while updating or modifying a previous DBT 11.1 SR3 installation, then the installer might need to deactivate DBT in before relocating the activation files. It will do this automatically; but this will leave your software deactivated, so you'll have to activate it again when you next run DBT.
When you select a Custom installation, the Destination Folder dialog required to change the location where DBT itself or its activation files are stored is but the first of two dialogs that the installer inserts into the normal sequence. The second of these two dialogs is used to choose specific features to be installed. It looks like this:
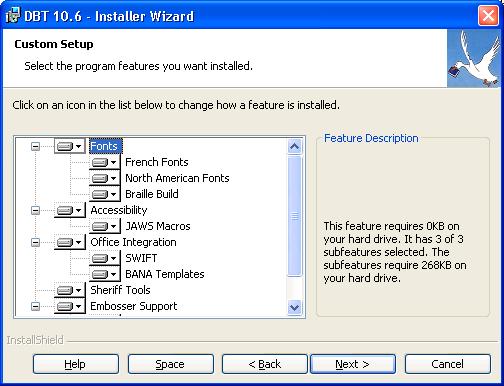
The most important part of this dialog is the tree control, on the left side of the dialog. This is used to show which features are currently selected for installation, and can be used to select or de-select features for installation.
The tree control shows only the name of each feature, but that doesn't always tell you enough about it to know whether you want it installed. As you select each item in the tree control, additional information is displayed in the "Feature Description" portion of the dialog, to the right of the tree control. Read this information before de-selecting a feature for installation. You cannot de-select the basic features of DBT, so you cannot create an installation that just won't work. But you still will want to avoid de-selecting something based only on its name. It might be more useful than the name would imply.
Our example screen shot above doesn't show a true feature description because a feature group ("Fonts") is selected. If we were to push Down Arrow to move the selection to the first individual feature ("French Fonts"), then the feature would be described.
The following keys can be used within the tree control:
When the Feature Selection dialog is first displayed, all feature groups are expanded, so all individual features are showing. Moreover, most or all feaures are selected for installation.
To de-select a particular feature, navigate to it within the tree control, using the keystrokes shown above, or by clicking on the feature with the mouse. Now push Spacebar or right click on the feature with the mouse. A menu will pop up, as shown here:
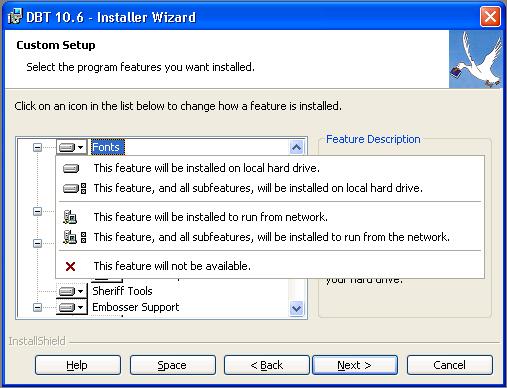
Use the Up Arrow and Down Arrow keys to navigate among the choices in the pop-up menu. When you reach the one you want, use the Enter key to select it. Or you can select an item from the menu using the mouse by clicking on it.
The pop-up menu contains these choices:
If you bring up the pop-up menu for a feature and decide that you don't want to change whether it is to be installed, you can dismiss the menu by striking the Escape key. Either Escape or Enter will dismiss the menu; Enter may change whether the feature is to be installed.
You can continue navigating through the tree control, observing the Feature Description, and using the pop-up menu to change whether a feature is to be installed, until you are satisfied that you've selected just the right combination of features. When you're done, click the Next button, or type Alt+N, to continue.
The other buttons at the bottom of the dialog are typically not necessary to use. The Back and Cancel buttons serve their usual functions. The Help and Space buttons both bring up informational dialogs. The Help dialog explains what the different choices in the pop-up menu mean, and what the icon associated with each choice looks like. But it won't tell you that setting a feature to run from the network isn't supported by DBT. The Space dialog lists the hard drives you have and how much space is available on each. It will highlight any hard drive that doesn't have enough space to install DBT. So if you're tight on space, you can use that dialog to explore where there might be room for DBT. Note also that de-selecting features for installation will reduce the space needed for the installation.