Per-Machine (Stand-alone) Installation
What is a Stand-alone Installation?
A stand-alone installation of DBT is simply an installation
that is independent of others on your network. The Server Image that you
create helps you to streamline the process of installing DBT on several
computers, but the result is no different than if you had repeatedly followed
the Simple
Installation instructions.
In particular, each copy of DBT must be activated on its
own.
Normally, DBT can only be activated by an Administrator.
In many environments, this can be a burdensome requirement when many stand-alone
installations need to be activated. For this reason, DBT offers the option
of allowing stand-alone installations to automatically activate themselves.
To take advantage of this option, you must create a Server Image, as specified
in the instructions below.
If you prefer, you can explore more automated ways to install
DBT from your Server Image, including a fully-supported Unattended
Installation method and a fully-supported Quiet
Installation method that runs completely in the background.
What is Required to Create the Server Image?
There are some requirements to creating the Server Image:
- You need to know the path to the standard version
of the installer. If you have the DBT distribution CD in your computer,
this might be D:\dbt-1006.msi. But it's up to you to know for certain.
- You must have a network location or share available
in which to store the Server Image. This location should be a place to
which you can write, and which is readable from all the computers on
which you intend to install DBT. Do not use C:\Program Files or the
Windows directory. There should be at least 35 MB free at this location.
The computer holding the server image need not be the computer that will
run the slsService. For the purposes of example, lets say that you have
set up a directory on "server10" called "DBTinstall".
The Network Location of the Server Image would be \\server10\dbtinstall
(assuming that the directory name is the same as the share name that the
client computer would see)
- You need to understand how to run programs from the
command line, such as PING, IPCONFIG, or REGEDIT.
- You should know your license text. This can usually
be found on a print-and-braille card that came with your original purchase
of DBT. It may also be found in a file called gjgmw.dxr or hjgmw.dxr that
came with your original purchase of DBT, if your first purchase was of
version 10.4 or earlier.
- You should verify that TCP/IP port 8080 is not in
use on your network, and will not be blocked by internal firewalls between
among the machines where DBT will be installed. If port 8080 is not available
or suitable, then choose another port that is, and play close attention
in the instructions to see what steps you'll need to customize.
- Know the DNS server name to address the server from
the client machine. If you do not have a name, you can use a static IP
number. Note: Do not use a dynamic IP number or things will only work
for a short time. Use
ipconfig /all <Enter>
to get the DNS name for the server. Use ping (name)
<Enter> on the client machine to verify that the
client machine can "find" the server with that name.
How do I create an appropriate Server Image?
Creating the Server Image is quite simple. Follow these steps:
- Open DBT's installer using the
msiexec.exe program and it's /a switch. The full command line for this
might be: msiexec /a d:\dbt-1101sr3.msi
- Click Next, or type Alt+N, to dismiss the Welcome Screen. (This screen is not shown here; it is very
similar to the first screen shown in the Simple Installation instructions, though a subtle difference in the text will show that you've started the process of creating a Server Image.)
- Please read the End User License
Agreement (EULA) in the next dialog, if you haven't read the EULA for DBT 11.1 SR3 before. You must agree to the terms of the EULA to proceed. Click
Cancel, or type Escape, if you do not agree to the terms. Otherwise, type
Alt+A to accept the agreement and Alt+N
to proceed. (The screen described in this step is exactly the same as
the second screen in the Simple
Installation instructions.)
- You will now see the installer's
Customer Information Screen, the same as the third screen shown in the Simple
Installation instructions. You can enter information in this screen
just as if you were doing a Simple Installation, but bear in mind that
any information you supply here will ordinarily be stored with the Server
Image. When you install from that image, the information you supply now
will be proposed again. We recommend that you enter your Organization
and License Text, but not a User Name. If a User Name is supplied, we
recommend erasing it. Or, if you want to supply a User Name, make it something
generic, e.g. "Braille Transcriber". Click Next, or type Alt+N, once you've supplied all the data you wish
to supply on this screen.
- The next screen is unlike anything
in the Simple Installation procedure. It looks like this:
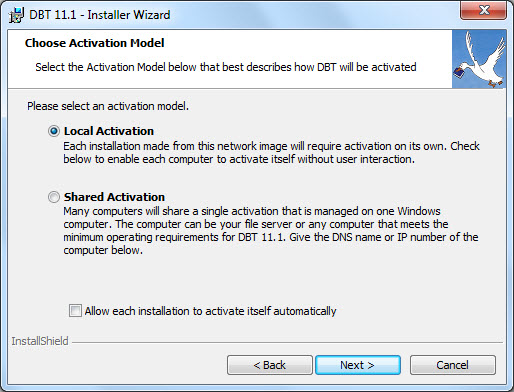
Note that "Local Activation" is already selected when this
dialog first appears. This is the correct option for stand-alone installations.
If you want to allow each computer to activate itself automatically when
DBT is first run, then you should use the Tab
key to reach the checkbox labelled "Allow each installation to activate
itself automatically" and the Spacebar
to check it. Or you can just click the check box with the mouse. (If you
do this, then each computer will activate itself, reporting its Computer
Name and License Text to our Activation Server. This requires port TCP/IP
access to activation.duxburysystems.com or port 443 and/or port 80.) Click
Alt+N to continue.
- The installer now may
display the following screen:
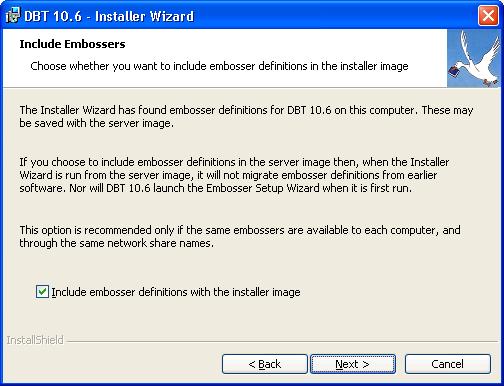
This screen is only shown if there are one or more embosser configurations
defined, for "All Users on This Computer", by an existing DBT
11.1 SR3 installation on the computer where you're running this process. If
you don't see this screen, then no embosser configurations will be included
in your Server Image. So, if you expect to be including embosser
configuration definitions in your Server Image, but don't see this screen,
please click Cancel (or press Escape) now.
Start the process again after you've checked your embosser configurations.
Remember that they must be on this machine, and the location setting must
be set to "All Users on this Computer". Only these configurations
can be shared through this process. If, on the other hand, you do see
this screen, but do not want to
include the embosser definitions in the Server Image, simply click on
the check box, or type Alt+I, to remove the
check mark. Click Next, or type Alt+N, to
continue.
- Now, the installer will display
this screen:
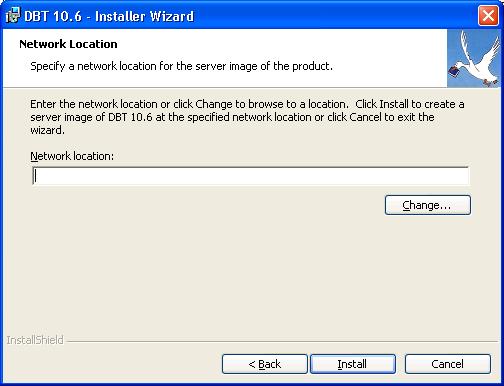
You should type the network path
where you want your Server Image created. In the example given earlier,
here you would type \\server10\dbtinstall presuming that the server was
called server10 and the network share of the directory is called dbtinstall.
You may use the Change button to browse for this path. The installer will
create the path if necessary, and will create or overwrite directories
within that path. Click Install, or type Alt+I,
to begin creating your Server Image.
- The installer will display a
dialog with a progress bar and cancel button, much like the one shown
in the Simple
Installation instructions, and eventually a Wizard Completed dialog,
as shown there as well. Just click the Finish button, or type Alt+F,
and your Server Image is completed.
How do I install on the Client Machines?
After you've created the Server Image, you should install DBT on each
client computer from it. Follow the Simple
Installation instructions, except that you should open your Server
Image from the client instead of inserting the original DBT CD.