Note: (1) These instructions were written for all versions of DBT from 11.2 on. (2) A word or abbreviation inside angle brackets, like <Enter> or <Esc>, indicates a specific key on your keyboard.
Acquiring a multi-user license for DBT enables you to run your own network-based DBT installation. A network-based installation of DBT is simply an installation in which all the instances of DBT, on as many machines as they are installed, are all activated through a single server machine on your network. Only the server computer needs to be officially activated; all other DBT’s on the network become activated as its clients. Naturally, the server must be activated for a sufficient number of users to serve your intended number of client DBT’s, and the server must be up and running at all times.
For this method of installation, you create a specialized installer package that we refer to as a server image. To use it, you must place the server image in a network location accessible by the client machines where you intend to install DBT, or you must copy it to the individual client machines.
If either creating the server image or mounting the image on your network is inappropriate for any reason, you should use the manual approach instead. See Network Installation using the Activation Wizard.
Network installation with automatic deployment consists of these steps:
Now we go through these steps in detail.
ipconfig /all <Enter> to find out its DNS name. Use ping server-name <Enter> on the client machines to verify that the client machines can locate the server with that name. (In this example, replace “server-name” with the actual name of your server machine.)We say, server or master workstation, because the computer you choose as the master for DBT activation need not be running a server operating system. This gives you a wider choice of which computer to use as your master for activation. If the computer you choose is not a Windows Server machine, then it must be at least a Windows 7 computer or later, and you need to be willing to leave it running whenever DBT is needed by any user on the network.
Once you have chosen a server machine, install DBT on it by following the Simple Installation instructions.
The next step is to activate DBT on the server machine. When you launch DBT, you will see the Activate button on the splash screen. When you click that (or the like button in the About DBT dialogue), it invokes the Activation Wizard. The Activation Wizard can also be run directly from the DBT home folder (actwiz.exe).
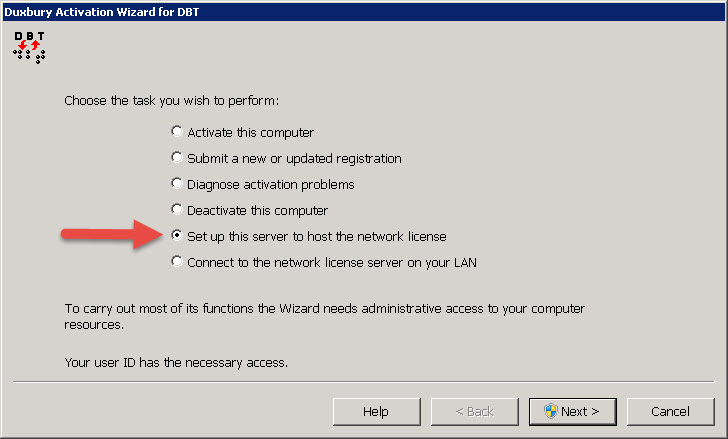
On the Activation Wizard main page is a radio button labeled, Set up this server to host the network license. Select that choice and click the Next button.

From there you can simply follow the instructions in the Activation Wizard, but here are some helpful tips.
To see how to invoke the Activation Wizard from DBT and get an overview, see Registration and Activation or see Activation Wizard Help for page by page information.
Note: This is the only activation you should do. Do not attempt to activate the individual client machines.
Now that the server is activated for DBT, you may configure the embossers that you wish to support for all DBT installations on your network.
To create global embosser configurations, your DBT must be running with administrative privileges. Start DBT by right clicking on the DBT icon and select Run as administrator. Then, at the User Account Control (UAC) prompt, enter the admin password if needed.
In the DBT menu bar, open the Global menu and select Embosser Set-up. Use the New button in the dialogue box to define new embossers (or use Modify Embosser to revise existing definitions). Enter all the settings your embosser requires, and on the General tab you must set the value of Configuration Location to “All users on this computer.” You must do this explicitly to share the embosser definition; this is not the default setting.
At this time, only configure the embossers that you intend to share with all the DBT client machines.
Summary: Just the same way most Duxbury programs are installed from an installer package (an .msi file), you install the Shared License Service from its installer, duxsls-0100.msi (Note: the version number is subject to change). When you complete the installation, the network license-sharing service starts up. This service allows other machines on the network to obtain their activations from your server.
The Installer: The installer guides you through each step, beginning with the End User License Agreement, which you must accept to enable the Next button, and which we recommend you read through at least once. By default the installer places the Shared License Service files in the Duxbury \ "Shared License Server" folder. We recommend you accept the default location.
On the last page of the installer, the Install button completes the installation using the selected folder. If your version of the installer includes a check box prompting you to “Configure and start service” you should leave that item checked, because it will open the Duxbury SLS Editor for you automatically. If not, you need to go to your selected installation folder (again, the default is "Duxbury \ Shared License Server") and click on the DuxSlsEditor.exe to run it.
The Editor: If your installation includes multiple versions of DBT, or includes other Duxbury products like NimPro, or uses third-party software that is activated using Sheriff, you need to configure them to work in concert through the SLS Editor. Even if you have no complications, you still invoke the Editor in order to build the required initialization files and to start the service.
The Editor prompts you for a port number for the Shared License Service. As previously noted the default is port 8080, and you can use that if it is not already in use or unsuitable for some reason local to your own network. If you entered a different port number in the Activation Wizard, enter that same port number here.
On this same screen, the Editor provides a list of check boxes where you indicate which Duxbury products you wish to share from this server. In the most common case, that list contains only a single version of DBT that you have just installed and activated, or the combination of DBT and NimPro. In the most complicated case, the list may include several Duxbury products and versions, or even third-party software.
Unless necessary, we do not recommend running third-party products (should any be listed) under the same port number as your Duxbury applications. In the most complex case, conflicts between Duxbury and third-party software may possibly be resolved by editing the content of the initialization (.ini) files per the next screen in the Editor. Consult your local IT personnel if you need to do this. Normally no editing of these settings is required.
On leaving the Editor you must click the Start Service button to launch the Duxbury Shared License Service. You can confirm this service is running by finding it under this name in your Services control panel. That is variously found under Administrative Tools or Computer Management (or elsewhere) depending on your Windows OS version.
The Duxbury Shared License Service is not added to the list of rules (or programs) in your firewall automatically. You must edit the Inbound Rules of the Windows Firewall (or a similar list of programs for a third-party firewall) in order to add it.
Using the Firewall in Windows 7 and Windows 10 as an example:
In the Windows Firewall, you need to access the Advanced Settings (administrative level) functions.
To avoid confusion, we suggest you name the new entry, “Duxbury Shared License Service.”
Assuming you have installed the Shared License Service in the normal location, the program you need to allow is under the “Duxbury \ Shared License Server” folder. The program you need to allow is named “slsServer.exe”.
Once you create the new entry, you can open the specific port number through which this service communicates. In the Windows Firewall this setting is found under the Properties of the Duxbury Shared License Service.
Consult your specific firewall documentation for additional guidance.
All the preceding steps have been done on your DBT server machine. This step must be done there as well, because this is the only way to include global embosser definitions in the server image that you will use to install your clients. At the end of this procedure, you place the server image in an empty destination folder either on the DBT server or another network location.
Note: The destination folder must be a writable shared volume and accessible by your client computers.
To create your server image:
From a command prompt window, open the DBT installer by invoking the Windows msiexec.exe program with the “/a” switch and the path to the installer. If you are installing from a Duxbury CD on your D: volume, for example, the command line is:
msiexec /a D:\dbt-1204.msi <Enter>
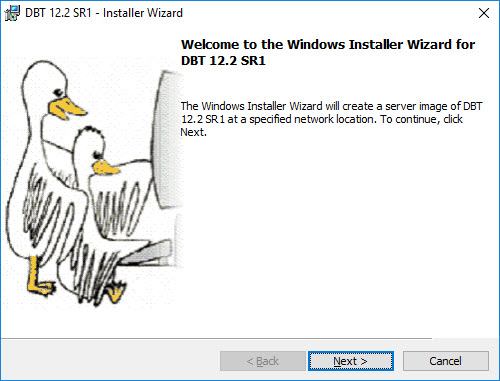
The next screen, Choose Activation Model, is unlike anything in the Simple Installation. It looks like this:
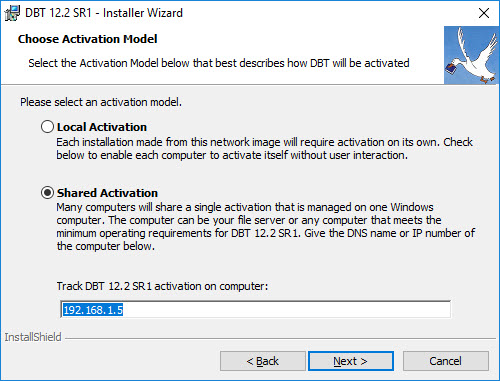
When this dialogue opens Local Activation is selected. Change the selection to Shared Activation (push the down-arrow key or click on the second radio button). Shared Activation is the required option for sharing DBT activations over the network. Now use the Tab key to reach the text field labeled Track DBT activation on computer and type the DNS name or IP address of the server that you just activated. Click <Alt>+N to continue.
Notes: First, you can only use an IP address if it was assigned to the server as a static IP number. Second, if you are using a port other than 8080, you must add a colon and the port number to the contents of this field. For example, for a computer named “Server6” using port 8010 you might enter "Server6.mydomain.com:8010".
If, as described earlier, you have used DBT – on this computer – to configure at least one braille embosser for “All users on this computer,” the installer now displays the Include Embossers screen:
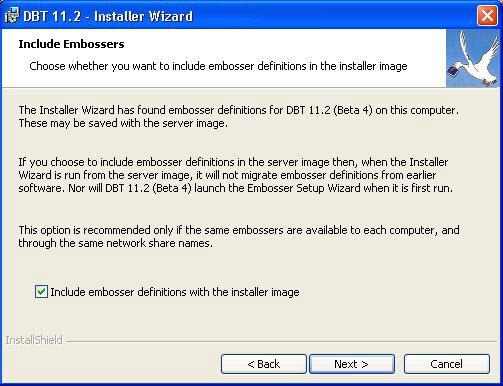
If you do not see this screen, no embosser configurations will be included in your server image!
If you intended to include global embosser configurations in your server image but do not see this screen, you must click Cancel (or press <Esc>) and start the process over after you have created them. Remember that they must be created on this machine, and the location must be set to "All Users on this computer." Only the configurations for all users are included in the server image.
If, on the other hand, you do see this screen, but do not want to include embosser definitions in the server image, simply uncheck the check box or type <Alt>+I, to remove the check mark. Then click Next, or type <Alt>+N, to continue.
Next, the installer displays the Network Location screen:
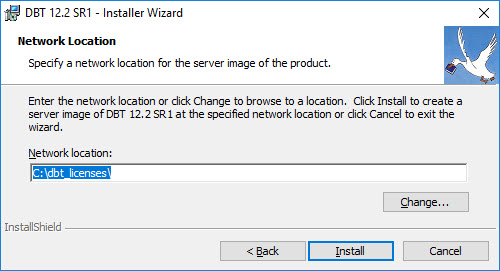
You must provide the network path (shared volume) where you want the server image created. Remember that the server image destination must be an empty folder where you have write access. For example, given a server named “server10” and a location found at the simple path “DBTinstall\new,” you would enter “\\server10\DBTinstall\new” in this field. You can also use the Change button to browse for the destination path you have prepared.
Note: The installer will create the destination path if it does not already exist. In the process it will create or overwrite directories within that path as necessary.
Click Install, or type <Alt>+I, to begin creating your server image.
After you have created the server image in a network accessible location, use it to install DBT on each client computer. From the client machine, double click on the server image, and follow the instructions. This proceeds like a Simple Installation, except that your text information and selections have all been pre-entered for you.
If for any reason you need to copy the server image in order to install it on a client, be sure to copy the entire server image directory and its subfolders!
Unattended Installation is a feature available with any installer built with Windows installer technology. However, because you are not given the chance to give any data to the installer while it runs, it only makes sense to do this with the DBT installer in those cases where you know the installer already has all of the data it needs, as with a fully set-up server image.
While Unattended Installation is running, you see only a small dialogue with a progress bar and a Cancel button. It is possible to cancel Unattended Installation, just like a normal installation.
To start Unattended Installation, you must run msiexec.exe with both the /i and /passive msiexec command-line options. For example, if your server image is in a file called dbt-1202.msi at a network share location called \\Server2\Images\DBT 12.4, then you would give the following command to install DBT without any user interaction:
msiexec /i "\\Server2\Images\DBT 12.4\dbt-1204.msi" /passive
(Note: In this example, quotation marks are needed because the installer path contains spaces.)
You can run this command either from a command prompt window or from the Run prompt in the Start Menu. You may need to specify the full path to the msiexec program. Typically, this is C:\Windows\System32\msiexec.exe.
Quiet Installation works like Unattended Installation, except that the process runs completely in the background with no progress display.
As with Unattended Installation, you should use Quiet Installation only after you have provided all the needed data by creating a server image.
To start Quiet Installation, you must run msiexec.exe with both the /i and /passive msiexec command-line options. For example, if your server image has been placed in a file called dbt-1202.msi at a network share location called \\Server2\Images\DBT 12.4, then you would give the following command to install DBT without any user interaction or progress dialogue:
msiexec /i "\\Server2\Images\DBT 12.4\dbt-1204.msi" /quiet
(Note: Again, quotation marks are needed around the installer path because it contains spaces.)
You can run this command either from a command prompt window or from the Run prompt in the Start Menu. You may need to specify the full path to the msiexec program, typically, C:\Windows\System32\msiexec.exe.