Please Note: The BANA Template files have all been updated in November 2015.
DBT’s BANA Braille 2015 template discussed in this section is only available for Microsoft Word 2003 and newer.
Although designed for those using BANA’s Braille Formats Principles of Print-to-Braille Transcription, 2011, there is no reason why the template cannot be modified for different braille layout standards worldwide.
The template has been a work in progress since 2000, and developed by Susan Christensen, a well-known North American braille transcriber and trainer.
This topic potentially provides five valuable, labor saving templates. One for Microsoft Word, and four for DBT. The Word and DBT templates are in fact technically linked as you will discover when you read further. The BANA Braille 2015 template is now powerful enough that many users can do all of their work in Microsoft Word, and DBT is used for translating and embossing.
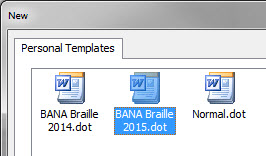
If Word 2003 or newer is already on the computer when DBT is installed, a new Word template called “BANA Braille 2015” should have been added to your Word Templates as shown below. For those who used earlier versions of the template, it’s important to now use the BANA Braille 2015 template to take advantage of the latest features. You may leave the earlier templates on your computer.
If the BANA Braille 2015 template was not installed, you may either reinstall DBT, (See DBT 12.1Installation) or copy the "BANA Braille 2015.dot" file into your Word Templates folder. A backup copy of the template is usually found in C:\...\Duxbury\DBT 12.1\Templates.
Additionally you will find DBT includes four templates called, “English (BANA Pre-UEB Textbook DE) – BANA, English (BANA Pre-UEB Textbook DE) - BANA Nemeth, English (UEB) – BANA, and English (UEB) - BANA with Nemeth.” Using the Word BANA Braille 2015 template to create documents will provide you with a file which can be imported into DBT using one of the BANA templates. The Word styles are mapped to corresponding DBT/BANA styles. You must use one of these corresponding DBT templates for the BANA Braille 2015 created files to open and translate correctly.
See "Producing Nemeth Code within UEB" on page 1 for additional information on using these new Nemeth codes.
All styles using a nested list format (1-3, 1-5 3-5, 1-7 3-7 5-7, etc.) are much easier to use. This includes Contents, Exercise, Glossary, Index, List, and Poetry styles. For example, in the Exercise menu you’ll find Exercise 1 - Exercise 6. It is no longer necessary to distinguish between a 1-level exercise section and one with multiple levels of hierarchy. DBT now automatically adjusts the runover based on how many levels are used. However, because the runover is dependent on the number of levels, these styles in Word can no longer provide the visual cues of what the braille indent/runover will look like.

Before you begin, it is suggested that you turn on the Style Area in Word. This works in Normal View (Word 2003)/Draft View (Word 2007/2010/2013). It displays a column on the left hand side of your document, showing the paragraph Word styles in use. Click here if you would like to know how to set this up on your system.

Word 2003: File | New | (Task pane) Templates | On my computer | General | BANA Braille 2015
Word 2007: Office Button, New, My Templates … | My Templates | BANA Braille 2015 (May be found in Recently Used group after first time)
Word 2010: File, New, My templates | Personal Templates | BANA Braille 2015 (May be found in Recent templates after first time)
Word 2013: File, New, Personal | BANA Braille 2015
Word 2016: File, New, Personal | BANA Braille 2015
It is necessary to attach the BANA Braille 2015 template if a file has already been created with another template (most likely Normal.dot). This can be easily accomplished in one of two ways.
Word 2003:The best option is to attach the BANA Braille 2015 template to the current file. Tools | Templates and Add-ins | Document template | Attach | BANA Braille 2015 | Open.
Make sure Automatically update document styles is checked before clicking OK.

Note: It is strongly suggested that after clicking OK that you return to the dialog and uncheck Automatically update document styles.

Word 2007/2010/2013/2016: The easiest option for access to the Templates and Add-ins dialog is to add it to the Quick Access Toolbar (QAT).
A ScreenTip appears with each button as long as Word is configured to see ScreenTips.
Word 2003:Tools | Customize | Options | Other | Show ScreenTips on toolbars is checked. Shortcut keystrokes are shown if Show shortcut keys in ScreenTips is checked.

Word 2007:Office Button | Word Options | Popular | Top options for working with Word | ScreenTip style: “Show feature description in ScreenTips”

Office Button | Word Options | Advanced | Display | Show shortcut keys in ScreenTips

Word 2010/2013/2016:The navigation to these items are different than Word 2007, but the options to be selected are the same.
File | Options | General | Use Interface options | ScreenTip style: “Show feature description in ScreenTips”
File | Options | Advanced | Display | Show shortcut keys in ScreenTips
Word 2003:Three toolbars are added to the toolbar area when the BANA template is active.

Word 2007/2010/2013/2016:The toolbars appear in the Add-Ins tab.

Besides using a mouse, styles can be accessed with shortcut keys.
Some styles have shortcut keystrokes already assigned, so the style can be applied within the document by pressing the shortcut. For example, the shortcut keystroke for Heading 1 is Alt+Ctrl+1.
Word 2007/2010/2013/2016:Use key tips to access the BANA template menus and styles. Press Alt and follow the shortcut keys provided.


This toolbar includes menus for paragraph styles and page setups. The menus are categorized to allow faster access to a small set of related styles.
Style names are used for those who may not be as familiar with the actual indent/runover required for a particular format. The Numbered menu may be used by those who prefer to think of format in terms of the specific indent/runover, or when you don’t want any blank lines or protection associated with another style used (for example, it may be preferable to use 1-3 vs. List).
Styles with blank lines included as part of the style:
Body Text, Left Flush, Quote, Right Flush, Help


The Centered style can be used for centered headings, such as Unit/Part, that don’t have an entry page number.
Use Centered with Guide dots when a Unit/Part heading includes an entry page number. This will keep the heading centered and allow you to use the Guide Dots character style for the page number.
The nested list format is used for the TOC styles, and DBT now automatically adjusts the runover.
The Codes for First and Last Lines are used to keep text from appearing on the first and last lines of the braille page and interfering with table of contents entry page numbers. Insert the appropriate codes at the top of the table of contents. Typically a transcription to be embossed single-sided will select All Pages. Codes for the first line do not need to be used when a running head is used. If braille page numbers are suppressed on even pages for interpoint, select the appropriate option.
Once the table of contents is completed, it is necessary to insert the Resume Text on First Line and Resume Text on Last Line codes so text will again appear on the first and last lines. (See sample file: front matter pages.docx)
No TOC First Line All Pages [[*svrhp3*]][[*tls*]] [[*tle*]]
No TOC First Line Even Pages [[*svrhp2*]][[*tls*]] [[*tle*]]
No TOC First Line Odd Pages [[*svrhp1*]][[*tls*]] [[*tle*]]
Resume Text on First Line [[*tld*]]
No TOC Last Line All Pages [[*svrfp3*]][[*rfs*]] [[*rfe*]]
No TOC Last Line Even Pages [[*svrfp2*]][[*rfs*]] [[*rfe*]]
No TOC Last Line Odd Pages [[*svrfp1*]][[*rfs*]] [[*rfe*]]
Resume Text on Last Line [[*rfd*]]

Directions: 5-5 format. Note, Directions following a running head or print page indicator are now preceded by a blank line.
Exercise 1 – Exercise 6: The nested list format is used for the Exercise styles, and DBT now automatically adjusts the runover.

Alphabetic Division was added with the 2014 template. At least one line of text appears with the Alphabetic Division at the bottom of a braille page. For contracted braille, be sure to force the letter sign for A, I, O.
Insert the Discontinue Guide Words code [[*rfd*]] on the next page after the completed glossary. The code needs to go on the page after the completed glossary, otherwise guide words will not appear on the last page.

Centered can be used in conjunction with Heading 1 to easily separate multiple major headings and to get the required blank lines.
Centered (Full Line Width, No Blank Lines, No Protection) is preserved for those who produce centered title pages.
Heading 1: Centered with a blank line before and after the heading.
Heading 2: (5-5)
Heading 3: (7-7)
All headings are preceded by a blank line. Use 7-7 instead of Heading 3 when it follows a Heading 2.
The use of a Running head is an agency decision.

Alphabetic Division was added with the 2014 template. At least one line of text appears with the Alphabetic Division at the bottom of a braille page. For contracted braille, be sure to force the letter sign for A, I, O.
The nested list format is used for the Index styles, and DBT automatically adjusts the runover.

The nested list format is used for the List styles, and DBT automatically adjusts the runover.

This menu was called "Notes Plus" in previous versions of the template.
Attribution, Caption, CBC-Display are long-standing styles that have not changed.
Box Begin and Box Double can be modified with the color indicator. Insert the boxing line and add the appropriate color indicator, followed by a space, at the beginning of the boxing line.

Cross Reference (7-5)
TG-Key is used for tactile graphics keys and is a 6-8 format.
Transcriber Note formats the paragraph as 7-5 and encloses the paragraph in transcriber’s notes symbols (6, 3). The transcriber’s note can have multiple paragraphs, which will be in 7-5. DBT will enclose the note within the TN symbols (6, 3). Use the SimBraille Transcriber’s Notes symbols on the DBT Codes menu for transcriber’s notes with different types of format (headings, list, etc.).

The Notes menu was introduced with the 2014 template. It provides support for various types of notes and endnotes.
There are multiple ways in which notes can be handled in the Word file.
The Endnote Embed style is used when notes are moved to a separate section. This style is supported with the Endnotes Page Setup, which automatically inserts the necessary codes so DBT knows where to move the notes. Note: At this time it will be necessary to modify the DBT file to include the print page number for each note. (See sample file: endnotes.docx)

These styles can be used when total control is desired and are especially useful when blank lines are not wanted. Use 1-6 and 4-6 styles for partially bulleted lists.

Prose Play: (1-3)
Prose Stage: (5-5)
Verse Play 1: (1-5)
Verse Play 2: (3-5)
Verse Stage: (7-7)
Line numbered prose/verse cannot appear on the first or last line of a braille page (to keep print and braille page numbers from interfering with the line numbers in the right margin). Which option to select is based on if the braille page numbers appear on every page. If a running head is used, the first line code isn’t needed.
No Text First Line All Pages [[*svrhp3*]][[*tls*]] [[*tle*]]
No Text First Line Even Pages [[*svrhp2*]][[*tls*]] [[*tle*]]
No Text First Line Odd Pages [[*svrhp1*]][[*tls*]] [[*tle*]]
Resume Text on First Line [[*tld*]]
No Text Last Line All Pages [[*svrfp3*]][[*rfs*]] [[*rfe*]]
No Text Last Line Even Pages [[*svrfp2*]][[*rfs*]] [[*rfe*]]
No Text Last Line Odd Pages [[*svrfp1*]][[*rfs*]] [[*rfe*]]
Resume Text on Last Line [[*rfd*]]
After the completion of the line numbered material, it is necessary to insert the appropriate first and last line codes to allow text to once again appear on those lines. (See sample file: line numbered poetry with right margin codes.docx)

The nested list format is used for these styles, and DBT automatically adjusts the runover.
If the poetry has line numbers, see the discussion about “Codes for First and Last Lines” in the Plays section above.

The Tables menu was added with the BANA Braille 2014 template. Selecting the desired table will insert the appropriate codes before the table. Make sure to use End Table after the completion of the table.
Columnar [[*htbs;r:0:0:b:n:c*]]
Linear [[*htbs;r:0:0:b:n:p*]]
Listed [[*htbs;r:0:0:b:n:l*]]
Stairstep [[*htbs;r:0:0:b:n:s*]]
Unrelated Columns [[*htbs;u*]]
End Table [[*htbe*]][[*sk1*]]

The items on this menu help provide the correct format for front matter pages. These page setups are used when the braille includes the various types of preliminary pages.
Show/Hide (Ctrl+*) must be active.
Transcriber-Generated Page t1: is new. This inserts informational text that is deleted when the file is opened in DBT. Insert this at the beginning of the file to set up the t braille page numbers.
Special Symbols Page: This forces a new braille page, and inserts the SPECIAL SYMBOLS USED IN THIS VOLUME heading.
Transcriber’s Notes Page: This forces a new braille page, and inserts the TRANSCRIBER’S NOTES heading.
Preliminary Page p1: This inserts informational text that is deleted when the file is opened in DBT. Preliminary Page p1 is necessary for transitioning from t pages to p pages and to set the braille page number as p1.
Contents Page: This forces a new braille page, and inserts the CONTENTS heading, along with the Chapter line. It will be necessary to modify CONTENTS and Chapter if other text is used in print.
Main Body: This inserts informational text that is deleted when the file is opened in DBT. The primary purpose is to discontinue the running head if used (insert again after full title), force a new braille page, and to set the braille page number at 1. This is updated to force a new odd page in interpoint documents.
Other Braille Page Number (Replace __ w/ Number): [[*pv__*]][[*pnta*]]: For those who start a volume on a braille page other than 1, use this code and replace __with the appropriate number. The code will be inserted as a LeftFlush paragraph. Don’t insert other text in the paragraph. It should be placed between the MainBody and the Textbook Reference Page Number (RefPageNumber) paragraphs (either before or after the [[*rfd*]] code paragraph will work).
Endnotes Page: This option is also listed in this menu as well as the Notes menu.
(See sample file: front matter pages.docx
.jpg "DBT Codes Menu")
These items help control specific translation situations. Show/Hide (Ctrl+*) must be active.
DBT codes allow even greater control for preparing a file for braille translation. Many of the common codes have been placed on menus for easy access. Because the codes may be intrusive for general editing and printing, these codes are set up as hidden text. (It doesn’t matter if the codes are hidden or normal text.) To see the codes, it is necessary to work with non-printing formatting marks turned on by clicking ¶ Show/Hide (Ctrl+*). The codes appear in plum colored text with a faint dotted underline. How or when you choose to see the DBT codes is personal preference, although it is suggested they be visible while codes are being inserted into the document. The hidden code/text cannot be deleted or modified if it isn’t visible.
You can set an option if you would like to see only the hidden text without seeing the rest of the non-printing formatting marks. Those who use screen readers will find this option preferable.
Word 2003: Tools | Options | View and check Hidden text (Alt+t o, View, Alt+i).

Word 2007: Office Button | Word Options | Display | Always show these formatting marks on the screen: “Hidden text”

Word 2010/2013/2016: File | Options | Display | Always show these formatting marks on the screen: “Hidden text”
There are many DBT codes not included in the BANA Braille 2015 template. When it is necessary to insert one of these code, use this as the base, and replace __ with the correct code.

Displayed Material codes are used to adjust the left margin in a displayed section. Insert the Displayed Material Start code [[*svlma:2*]][[*sc1:1:1*]] before the displayed material section. This code creates a cell-3 left margin. Heading 1 (centered) remains centered on the full width of the page. All other styles are offset by 2 cells to the right.
After the completion of the displayed section, use the Displayed Material End code, [[*sc1:0:1*]][[*svlma:0*]].
To create a left margin beginning in cell 5, modify the Start code to [[*svlma:4*]][[*skn1:1*]].
(See sample file: displayed material.docx)

Do not format bold/italic text with another character style (such as uncontracted or Spanish), as Word will delete the bold/italic font attributes. Apply the character style first and then add the bold/italics on top of the styled text. Sometimes it is easier to use the emphasis codes instead of using bold/italics.
Bold Start [[*fts~b*]]
Bold End [[*fte~b*]]
Italics Start [[*fts~i*]]
Italics End [[*fte~i*]]

It may be necessary to force or suppress a letter sign for correct translation. Being aware of this and inserting the appropriate codes within the Word file will save time later.
Letter Sign Force [[*ii*]] Example: Put the book in box [[*ii*]]b.
Letter Sign Suppress [[*i*]] Example: Henry [[*i*]]V (Note: This code will also uncontract everything before the next space.)

Double line spacing (braille on every other line) is typically used in early grade books (after the title page).
Line Spacing Single [[*svsbl0*]]
Line Spacing Double [[*svsbl1*]]

Formats 2011 allows the use of Nemeth indicators for short sections of Nemeth in nontechnical books.
The SimBraille Nemeth Begin indicator is followed by a hard, nonbreaking space _%
The SimBraille Nemeth End indicator is preceded by a hard, nonbreaking space _:

Other than Nemeth, this set of codes has limited use.
Omit Number Sign Start [[*ons*]]
Omit Number Sign End [[*one*]]

Group: Used to keep text grouped together on a single line or treated as a single unit. The example keeps “artificial intelligence” on the same line.
Group Start [[*:*]]
Group End [[*;*]]
Example: [[*:*]]artificial intelligence[[*;*]]
Protect Block: Used to keep a block of text on a single page. A typical use is to keep test question and answer choices on a single page. (See sample file: test with protected questions.docx)
Protect Block Start [[*kps*]]
Protect Block End [[*kpe*]]
Protect Text: When possible keeps text on a single line and page. For example, use these codes to prevent a telephone number from dividing between lines or between two pages.
Protect Text Start [[*kbs*]]
Protect Text End [[*kbe*]]
Example: [[*kbs*]]1-800-555-5555[[*kbe*]]

Used to set the right margin with line numbered prose and poetry when text other than line numbered material appears on the braille page. (See sample file: line numbered poetry with right margin codes.docx)
Right Margin Normal [[*rm0:0*]]
Right Margin 3 [[*rm3:3*]]
Right Margin 4 [[*rm4:4*]]
Right Margin 5 [[*rm5:5*]]
Right Margin 6 [[*rm6:6*]]

This code is not needed very often, as lines can be skipped by pressing the Enter key (make sure DBT’s Word Importer is set to Preserve Skipped Lines). However, there are times, especially with tables, when this code helps DBT do a better job at determining a transition to a different type of text.

Forces a new line and maintains the correct runover position for DBT.

These codes are conditional new braille page breaks (no effect if already at the top of a page). They are inserted in a LeftFlush style and it is best to not include any text within the same paragraph.
“Top of Next Even Page” and “Top of Next Odd Page” are used with interpoint.
Top of Page [[*top*]]
Top of Next Even Page [[*top*]][[*sd0*]]
Top of Next Odd Page [[*top*]][[*sd1*]]

When a transcriber’s note is not in the typical 7-5 format (such as keys for stairstep tables and column/row headings), the beginning and ending symbol needs to be inserted. This will insert the 6, 3 symbol using the SimBraille font (assuming the font is installed).

Use the Grade 1 codes at the beginning of a file if the entire document should be uncontracted.
Grade 1 (Uncontracted) [[*tx*]][[*g1*]]
Grade 2 (Contracted) [[*tx*]][[*g2*]]

Places the print page number at the right margin in the Word file.
Apply to print page numbers that happen mid-paragraph
These items help control other page numbering situations (such as combined page numbers). Show/Hide (Ctrl+*) must be active.

Used to insert a range of print page numbers with the Textbook Reference Page Number (RefPageNumber) style. Example:
1-5[[*lec*]]5
The print page numbers in the braille are: 1-5, a5, b5, etc.
Used to discontinue print page numbers if a section of text doesn’t have print page numbers. Insert this code instead of a number in the Textbook Reference Page Number (RefPageNumber style.
It is necessary to let DBT know a letter sign is needed before small Roman numeral page numbers. Example:
[[*ii*]]xii
Make sure to include this code in the Guide Dots character style when formatting a table of contents. The letter sign will not be inserted correctly if this code is not included in the Guide Dots markup.
![Sample of using the letter sign code [[*ii*]] before the small roman numeral xiv](../../Resources/Images/BANA_Template_2014_Help/0200001D.jpg "Sample of using the letter sign code [[*ii*]] before the small roman numeral xiv")
PLEASE NOTE THAT THE MATH GROUP WILL ONLY APPEAR IF A BANA NEMETH TEMPLATE HAS BEEN APPLIED.

Enclosing linear math in this style will try to keep it on the same braille line and same braille page. Primarily used for importing Word documents correctly.
One Word Bridge is intended for a single word between two segments of technical notation. It puts that single word in UEB. But instead of the usual indicators to end and start Nemeth Code, it simply inserts dots 6, 3 before the word.
Use to specify text in a Nemeth document should be treated as Nemeth.
Use for embedded transcriber's notes (7 words or less). Beginning and ending TN (transcriber's note) symbols ,' are automatically inserted with the style (appears as ,' in the dxp document).

These SimBraille Nemeth emphasis indicators can be used as needed to control correct translation,
Begin Bold Exact ,'_ (followed by non-breaking space)
End Bold Exact _,' (preceded by non-breaking space)
Begin Bold/Italics Exact ,'_,'. (followed by non-breaking space)
End Bold/Italics Exact .,'_,' (preceded by non-breaking space)
Begin Italics Exact ,'. (followed by non-breaking space)
End Italics Exact .,' (preceded by non-breaking space)

These codes allow the Nemeth transcriber greater control over how text is translated. Show/Hide (Ctrl+*) - must be active.
Technical Context Start [[*tcs*]]
Technical Context End [[*tce*]]
Technical Notation Start [[*ts*]]
Technical Notation End [[*te*]]
Two new codes have been added for UEB only.
1. Text in Math Start [[*idle~ptims*]]
2. Text in Math End [[*idle~ptime*]]
See "Producing Nemeth Code within UEB" on page 1 for additional information on using these new Nemeth codes.
IPA characters enclosed in this markup are translated according to IPA Braille: An Updated Tactile Representation of the International Phonetic Alphabet.
Text marked up with this style is translated as CBC, using the appropriate indicators. Note: For proper mapping to DBT, make sure DBT’s Global | Word Importer | Transcribe Courier to CBC is unchecked. The style will take care of marking the CBC for correct translation.

Anything in this character style will appear in the SimBraille font (assuming the font is installed), and will import and translate into DBT without making any changes. Make sure DBT’s Global | Word Importer | Treat braille and SimBraille fonts as braille is not checked. (See above image) The style takes care of treating the font as braille.
Short transcriber’s notes within a paragraph are enclosed in this mark-up. DBT will enclose the note within the TN symbols (6, 3).
DBT will automatically insert the guide dots in DBT when this style is applied to the page numbers in a table of contents. Do not include the space preceding the page number within this mark-up.

Apply this style to glossary entry words and DBT will insert the guide words on the last line of the braille page.

Apply to prose and poetic line numbers at the beginning of the line in Word. DBT moves the line number to the right margin.

Apply to any word(s) that should be uncontracted.
Used when typing. This ends the character style being entered and returns to the format of the paragraph style in use.

Apply to French.
Apply to German.
Apply to Italian.
Apply to Latin.
Apply to Spanish.

Inserts _b followed by a hard, nonbreaking space. Replace b as needed for other colors.
Inserts _r followed by a hard, nonbreaking space. Replace r as needed for other colors.
Inserts _yh followed by a hard, nonbreaking space. Replace y as needed for other colors.
Inserts ,' preceded by a hard, nonbreaking space.

Inserts _4 for the primary bullet symbol.
Inserts _9 for the secondary bullet symbol.
You must use “English (BANA Pre-UEB Textbook DE) – BANA, English (BANA Pre-UEB Textbook DE) - BANA Nemeth, English (UEB) – BANA, or English (UEB) - BANA with Nemeth, created files to open and translate correctly.
When you launch DBT DBT Win 12.1 (SR1) the first time, make sure you accept installing the BANA template!
Before you do anything else, set up one of the BANA templates as the default template. This will make opening a file, or creating a new file, very quick. The standard template for most people is either English (BANA Pre-UEB Textbook DE) – BANA, or English (UEB) – BANA.
Go to File | New. The New dialog opens.
Scroll to the English (BANA Pre-UEB Textbook DE) – BANA or English (UEB) – BANA template and select it. Select “Mark template as default” and then OK. This template will now be automatically be selected whenever you open a file or create a new file.

Go through DBT’s Global dialogs and customize DBT. Especially take the time to set up your embosser through “Embosser Setup …”.
It is also very important to set up the Word Importer so it works correctly with the BANA template.
See other sections of DBT Help for assistance.
The number sign (#) can be replaced by any digit 1-6. This chart was prepared by Duxbury immediately prior to release. Should any errors be found, please e-mail support@duxsys.com.
| Word Style (BANA Braille 2015) |
Toolbar: Menu | DBT 11.3 Style |
|---|---|---|
| acronym | ||
| AlphabeticDivision | Styles: Glossary, Index | AlphabeticDivision |
| Attribution | Styles: Misc | Attribution. |
| Body Text | Styles: Body | B-BodyText. |
| BoxBegin (AutoText) | Styles: Misc | BB-BoxBegin. |
| BoxDouble (AutoText) | Styles: Misc | BD-BoxDouble. |
| BoxEnd (AutoText) | Styles: Misc | BE-BoxEnd. |
| BH-BoxCenteredHead. | ||
| BL-BlockProtectLevel. | ||
| bold | ||
| BP-BlockProtect | ||
| brldisplay. | ||
| brlinline | ||
| Caption | Styles: Misc | C-Caption. |
| CBC-Display | Styles: Misc | CD-CBCDisplay. |
| CBC-Inline | Character | CI-CBCInline |
| Centered | Styles: Contents, Headings, Index | Centered. |
| CenteredWithGuideDots | Styles: Contents | CG-CenteredWithGuideDots. |
| CenteredFullLine | Styles: Headings | CF-CenteredFullLine. |
| compdisplay. | ||
| compinline | ||
| CrossReference | Styles: Misc | CR-CrossReference. |
| Directions | Styles: Exercise | Directions. |
| DirectionsNemeth | Nemeth: Nemeth | DirectionsNemeth. |
| Embedded Textbook Reference Page Number | Character: Page Numbers | RefPageNumberEmbed |
| Exercise # | Styles: Exercise | E-Exercise. [hl#] |
| ExactTranslation | Character: Special | ExactTranslation. |
| Ex2Nemeth# | Styles: Nemeth | E-Exercise. [hl#] |
| Footnote | Styles: Notes | Footnote. |
| French | Character: Foreign | french |
| German | Character: Foreign | german |
| Glossary # | Styles: Glossary | G-Glossary. [hl#] |
| GO-GuideWordsOff | ||
| Group | ||
| GuideDots | Character | GuideDots |
| Guide Word | Character | GW-GuideWord |
| Heading 1 | Styles: Headings | H1-HeadingCentered. |
| Heading 2 | Styles: Headings | H2-HeadingCell5. |
| Heading 3 | Styles: Headings | H3-HeadingCell7. |
| i-italic | ||
| Index # | Styles: Index | I1-Index. [hl#] |
| IPA | Character | IPA |
| Italian | Character: Foreign | italian |
| Latin | Character: Foreign | latin |
| LeftFlush | Styles: Body | LeftFlush. |
| LinearMath | Nemeth: Nemeth | LinearMath |
| LineNums | Character | LineNums |
| List # | Styles: List | L-List. [hl#] |
| LitBold | Nemeth: Emphasis | LitBold |
| Literary | Nemeth: Nemeth | Literary |
| LitItalics | Nemeth: Emphasis | LitItalics |
| Main Body (AutoText) | Styles: Page Setups | MainBody. |
| NB-NoBold | ||
| NE-NewPageEven. | ||
| NN-NewPageNemeth. | ||
| NN-NewPageNext. | ||
| NoteSeparationLine (AutoText) | Styles: Note | NoteSeparationLine. |
| NO-NewPageOdd. | ||
| NS-NoNumberSign. | ||
| OneWordBridge | Nemeth | OneWordBridge |
| Poetry # | Styles: Poetry | P-Poetry. [hl#] |
| PrelimPageNumber (AutoText) | Styles: Page Setups | PrelimPageNumber. |
| ProsePlay | Styles: Plays | PP-ProsePlay. |
| ProseStage | Styles: Plays | PS-ProseStage. |
| Quote | Styles: Body | Quote. |
| RefPageNemeth | Nemeth | RefPageNemeth. |
| RefPageNemethEmbed | Nemeth | RefPageNemethEmbed |
| RightFlush | Styles: Body | RF-RightFlush. |
| RunningHead | Styles: Headings | RunningHead. |
| Soft Return (AutoText) | Character: DBT Codes | SoftReturn |
| Spanish | Character: Foreign | spanish |
| TechnicalNotation | Nemeth | TechnicalNotation |
| TG-Key | Styles: Misc. | TG-Key. |
| TN-Embed | Character | TN-Embed |
| TN-Nemeth | Nemeth | TN-Nemeth |
| TOC # | Styles: Contents | C-Contents. [hl#] |
| Textbook Reference Page Number | Styles: Page Numbers | RefPageNumber. |
| TranscriberNote | Styles: Misc | TranscriberNote. |
| Uncontracted | Character | Uncontracted |
| VersePlay1 | Styles: Plays | VP-VersePlay. |
| VersePlay2 | Styles: Plays | VP-VersePlay. [hl2] |
| VerseStage | Styles: Plays | VS-VerseStage. |