Introducing NimPro 3.0 (09/01/2022)
NimPro 3.0 is now shipping on Windows only. The most important improvents since NimPro 2 are:
- Support for EPUB 3 documents
- An Element Remapper for handling markup transformations required throughout a document file
While we have built NimPro 3.0 for Macintosh, we are not confident shipping it without pre-release consumer testing. Please contact us if you are interested.
For a deeper dive into NimPro 3.0, click here.
![]() Download NimPro 3.0 (Windows) or
Download NimPro for Mac 2.0
Download NimPro 3.0 (Windows) or
Download NimPro for Mac 2.0
NimPro 2.0 Service Release 1 for Windows (1/26/2021)
NimPro 2.0 SR1 handles recent enhancements in DBT templates and styles.
- The latest DBT (12.5) has templates that include new features that were unrecognized by NimPro 2.0. This service release brings NimPro up to date to use those DBT templates.
- Reference page numbers are styled correctly regardless of whether you are inside or outside of a Nemeth mathematics passage.
- Specifically for DBT versions 12.3 and 12.4, NimPro replaces older, incorrect definitions of the RefPageNemeth styles with updated, correct style definitions.
- In addition, document output from the NimPro command-line is now limited to document text only; there is no spurious text included from the document header.
- The Activation Wizard captures additional information to the log for improved diagnosis of customer problems.
- And, NimPro is now available on both the Windows and Macintosh platforms!
Introducing NimPro 2.0 (07/15/2020) & NimPro for Mac 2.0 (1/27/2021)
NimPro 2.0, on Windows and the Macintosh, is the product of years of development. Here is a brief tour of the most important advancements since NimPro 1.2.
- MathML: NimPro reads MathML documents and automatically transforms the math into the correct DBT styles and codes for braille output, producing both UEB Math and Nemeth Code. The full suite of NimPro Wizards and editing capabilities is available to prepare your math documents.
- Readability: NimPro displays Math equations in a two-dimensional layout along with any accompanying images, giving you excellent insight into the visual text presentation.
- Flexibility: NimPro allows you to select among four current DBT templates instead of using a single fixed format. These are your actual, installed DBT templates, covering UEB and Pre-UEB formats, for both literary work and math/technical work. (DBT 12.2 or newer is required.)
- Word Files: Along with direct output to DBT, NimPro can send MathML documents to Word for later transfer to DBT. If Microsoft Word is installed, NimPro can create the .docx format in addition to .doc and .rtf files.
- Image Replacements and Transformations: The latest NimPro includes QuickTac, with no extra download required. NimPro's close interaction with QuickTac allows you to create and retouch your tactile graphics until you get them just right, and it stores them with your project. In addition, NimPro alerts you when an image is used multiple times in the document and how your current action will affect the other instances.
- Better Wizards: The scope of application of the NimPro wizards is now rigorously controlled. The algorithm for bold and italic handling has been completely redesigned so that selected bold and italic changes are made accurately and faster.
- Maturity: NimPro can interpret more complex documents than ever before, including list items that contain images, tables, or multiple paragraphs. It processes images despite bitmap errors in the source. Both document navigation and text display are improved.
- NimPro for Mac 2.0 also has all the improvements in the latest NimPro for Windows service release.
- Ability to handle the latest templates in DBT 12.5.
- Reference page numbers are styled correctly whether inside or outside of a Nemeth mathematics passage.
- For DBT versions 12.3 and 12.4, NimPro replaces the old, incorrect definitions of RefPageNemeth styles with new, corrected definitions.
- The Activation Wizard captures more information to the log for better diagnosis of customer problems.
For a deeper dive into NimPro 2.0, click here.
NimPro 1.2 (02/26/2014)
This NimPro release contains significant improvements over NimPro 1.1.
- Complete support for network activation, not just independent activation. (NimPro network installations work like DBT network installations.)
- NimPro works smoothly with a remotely activated DBT.
- Support for custom installations on any drive, not just the default drive (C:).
- Improved output of italic (emphasized) text when exporting .dxp files for DBT.
- Improvements to background image processing and display, with better handling of images with problematic data.
- In the NimPro display, the old "word count" has been replaced by a more useful combination of a character counter, word counter, and estimator of the number of braille pages in the selected text.
- Clearer and more consistent font display.
- This release is necessary for NimPro to recognize the latest DBT release, DBT 11.2.
NimPro 1.1
Duxbury Systems has introduced a new product, NimPro, to read and process "NIMAS" files, the electronic DAISY/XML format used by publishers to comply with the National Instructional Materials Accessibility standard. NimPro is the bridge between these files and DBT. This product automates many of the common transcriber steps that can be very time consuming. These files can then be exported to DBT (version 11.1 or higher).
NimPro is currently available for $335 for licensed DBT users only.
Note: NIMAS files can be very large, which requires a lot of on-board memory. We recommend that your computer have 4GB of RAM memory (more if you have a more recent Windows OS) in order to deal with the larger NIMAS files. One of the advantages of NimPro is that it can divide these huge files into manageable pieces to submit to DBT.
For more background information on the files used with NimPro, please check out What are NIMAS Filesets? and Obtaining NIMAS Filesets.
Essential NimPro Functions
- NimPro prepares NIMAS files, that is, K-12 textbooks and instructional materials, for DBT. Often NIMAS files are huge, and loaded with graphics, which NimPro helps you manage.
- Nimpro contains automated "wizards" to convert inconvenient and inappropriate text styles into styles that facilitate correct braille, applied at the user's direction to the pages or sections the user selects.
- NimPro also has style editing functions to allow format changes to individual text elements.
- Nimpro has multiple tools for handling images. One is to render images from the original text into tactile graphics using QuickTac, invoked seamlessly from within NimPro. Another is to replace graphic images with text. A third is to replace graphic images with direct braille. These options are illustrated in screenshots below.
- NimPro exports (.dxp) files directly to DBT, ready for braille production.
- Nimpro also exports files in multiple Microsoft Word formats. These Word files include braille-ready (BANA) styles, so that Word can be used as an interim step before presenting files to DBT.
- NimPro lets you divide a large document into manageable segments, or just pick specific needed sections or pages for braille production.
- NimPro converts all unrecognized text styles into styles recognized by DBT.
- NimPro offers easy controls to adjust excess heading levels to match the needs of braille output.
- NimPro has controls to adjust automatic list numbering, bold face, and italics.
- NimPro automatically adds guide dots on tables of contents via the Table of Contents wizard.
- NimPro transforms the complex mark-up of tables into the correct format for DBT or MS Word. This includes handling lists or multiple paragraphs within tables, and tables nested inside other tables.
- NimPro lets the user control which page starts the output of reference page numbers.
- The NimPro editing window provides a Style Map and other cues to make the document structure visible. For example, it displays sidebars with a grey background to distinguish sidebars quickly from the main text.
- NimPro offers a separate "Source View" window to display the original raw document, with the complete XML mark-up, for user reference.
A Note about the NimPro Screenshots
The following screenshots give you a picture of what NimPro does and how to use it. For some of the large screenshots, you can actually click on the image to get better resolution and a closer look. Then, just click the browser Back button to return to this web page.

A Brief Illustrated Tour of Duxbury NimPro
The NimPro main menu appears across the top border of the application window. These top bar controls include:
- File
- Edit
- View
- Help
The File menu has the commands you would normally expect, of course, but it also opens the User Preferences dialog, an informative choice for learning about NimPro operation. It has three tabs as shown below:
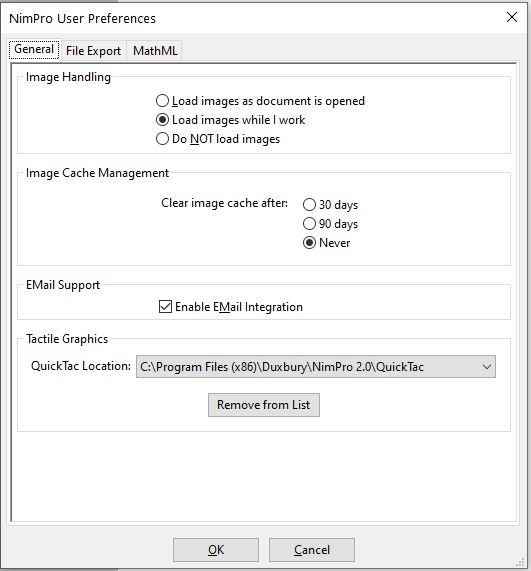
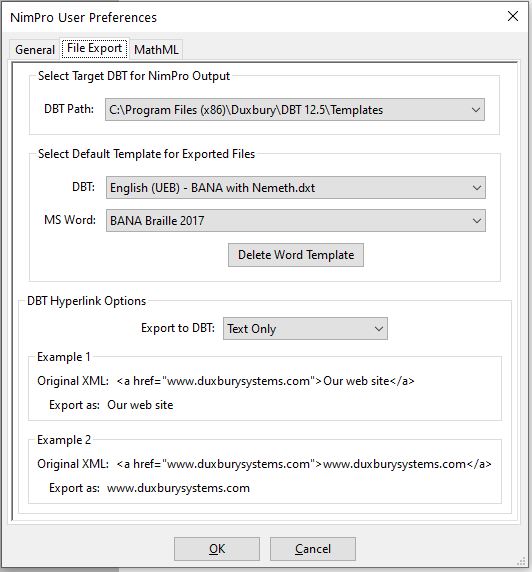
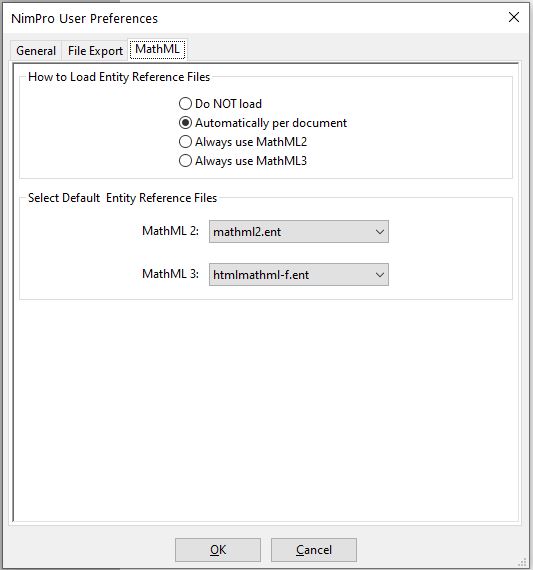
You can see that NimPro gives the user a lot of control over how to handle a NIMAS/Daisy file, and these controls represent a number of NimPro functions. NimPro can import and manage graphics files when the text is read. NimPro can integrate with your e-mail software to help you send technical support requests. NimPro co-ordinates with the Duxbury QuickTac tactile graphics tool (which is now included in the NimPro download). NimPro can create Microsoft Word documents, and offers a choice of Word Templates with ready-for-braille styles in them. NimPro gives you a choice of four different DBT templates to use for creating DBT files. It provides input options for interpreting MathML files, as well as output options for rendering hyperlinks.
Saving Selected Pages or Sections
This next screen is your first look at an active document window, and it shows a lot all at once. There are three main parts to the window. On the left is the Navigation Pane that displays the document either as a list of pages or as a branching tree of document sections and sub-sections. This allows you to select the specific sections or page numbers you want to work on. In this case, three sections are highlighted, which makes them active for whatever command the user next selects. Here, the user has opened the File menu to Save Selected Sections. The grey column next to the Navigation Pane is the Style Map, where you can see the style names associated with each of the paragraphs displayed in the Text View window to its right.
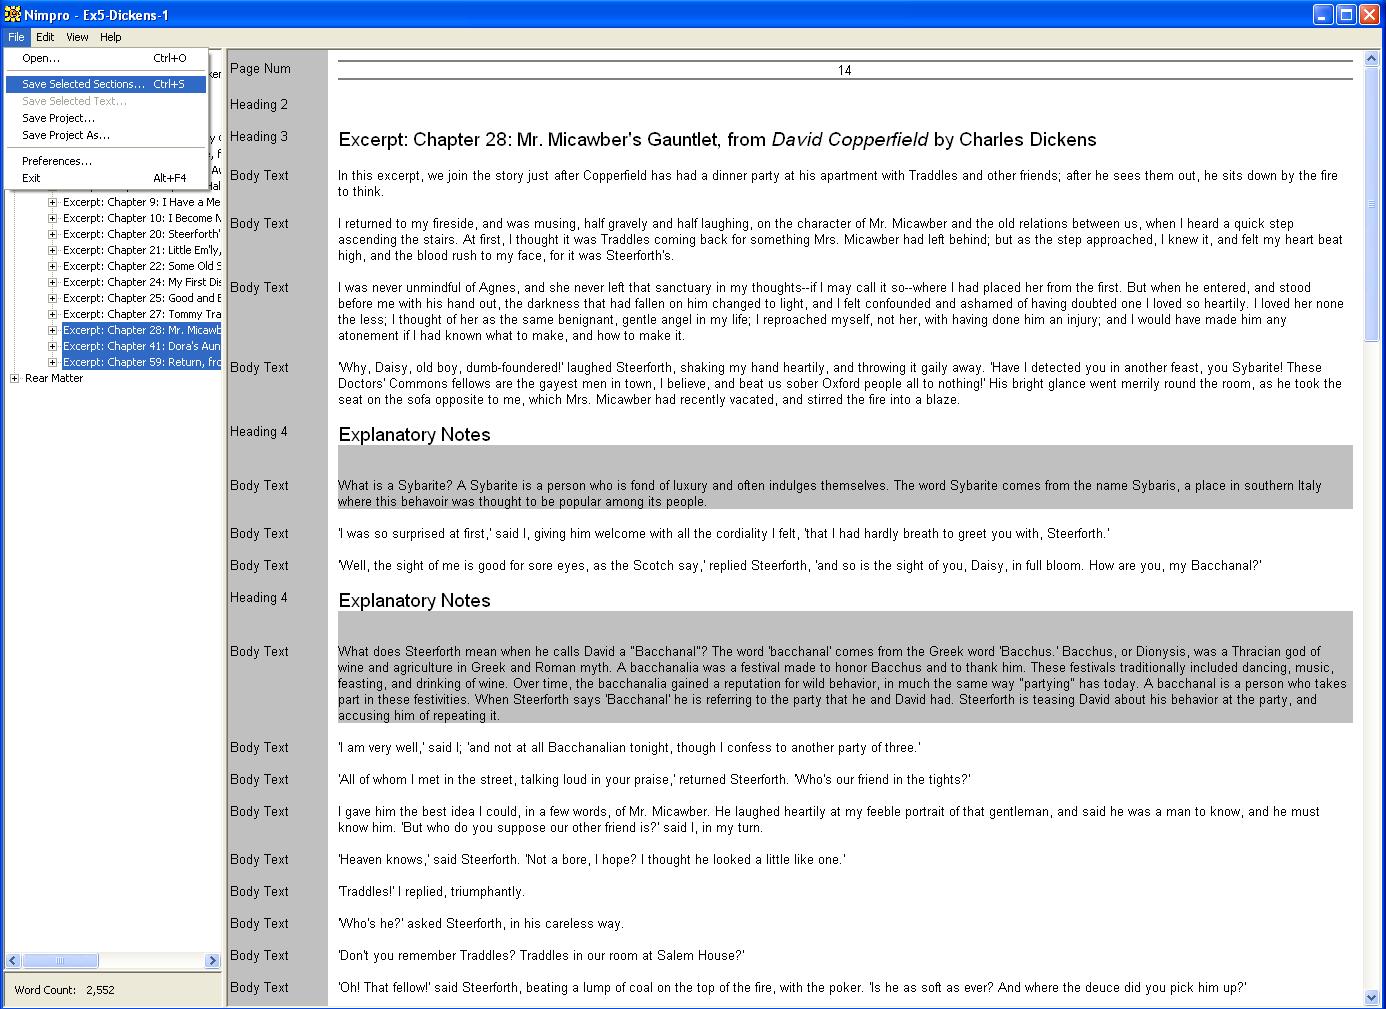
As the user continues to save these sections, she will be presented choices for the file name, the file type, etc. The selected text could be destined for DBT directly, or perhaps to Word for additional Word-style editing.
Given that NIMAS files are designed to hold an entire book, they are often very large. It can be more convenient in DBT or Word to work with these books only a section at a time, and NimPro provides that flexibility.
Changing Styles Manually
A toggle in the Edit Menu allows the user to choose between editing text or editing styles. When you Edit Styles, you place the cursor on the text block (list item, paragraph, etc.) of interest, then you use the keyboard to enter a one- or two-character code for the new style, and NimPro automatically moves to the next text block for you to continue. In this example, the user is partially done switching from the List style to the Exercise style, and from Body Text to Directions.
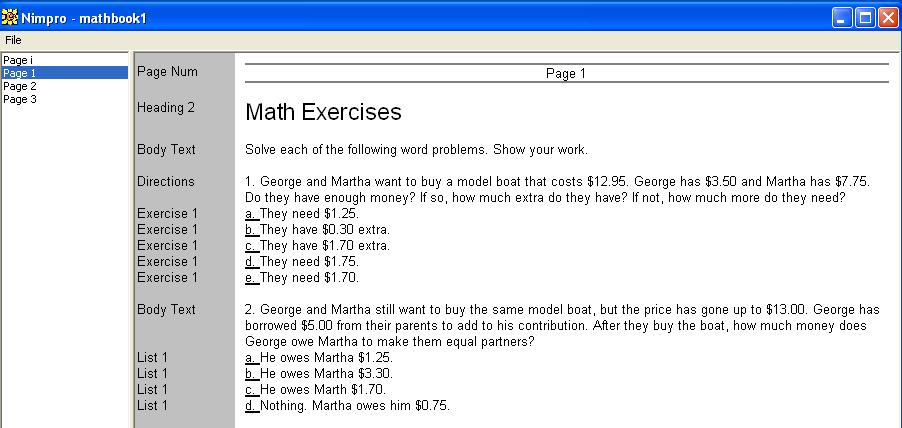
Note, however, that while this is a way to change individual styles, there is often a better way.
The Edit Menu holds a suite of Wizards that allow you to change hundreds of paragraphs in a single stoke.
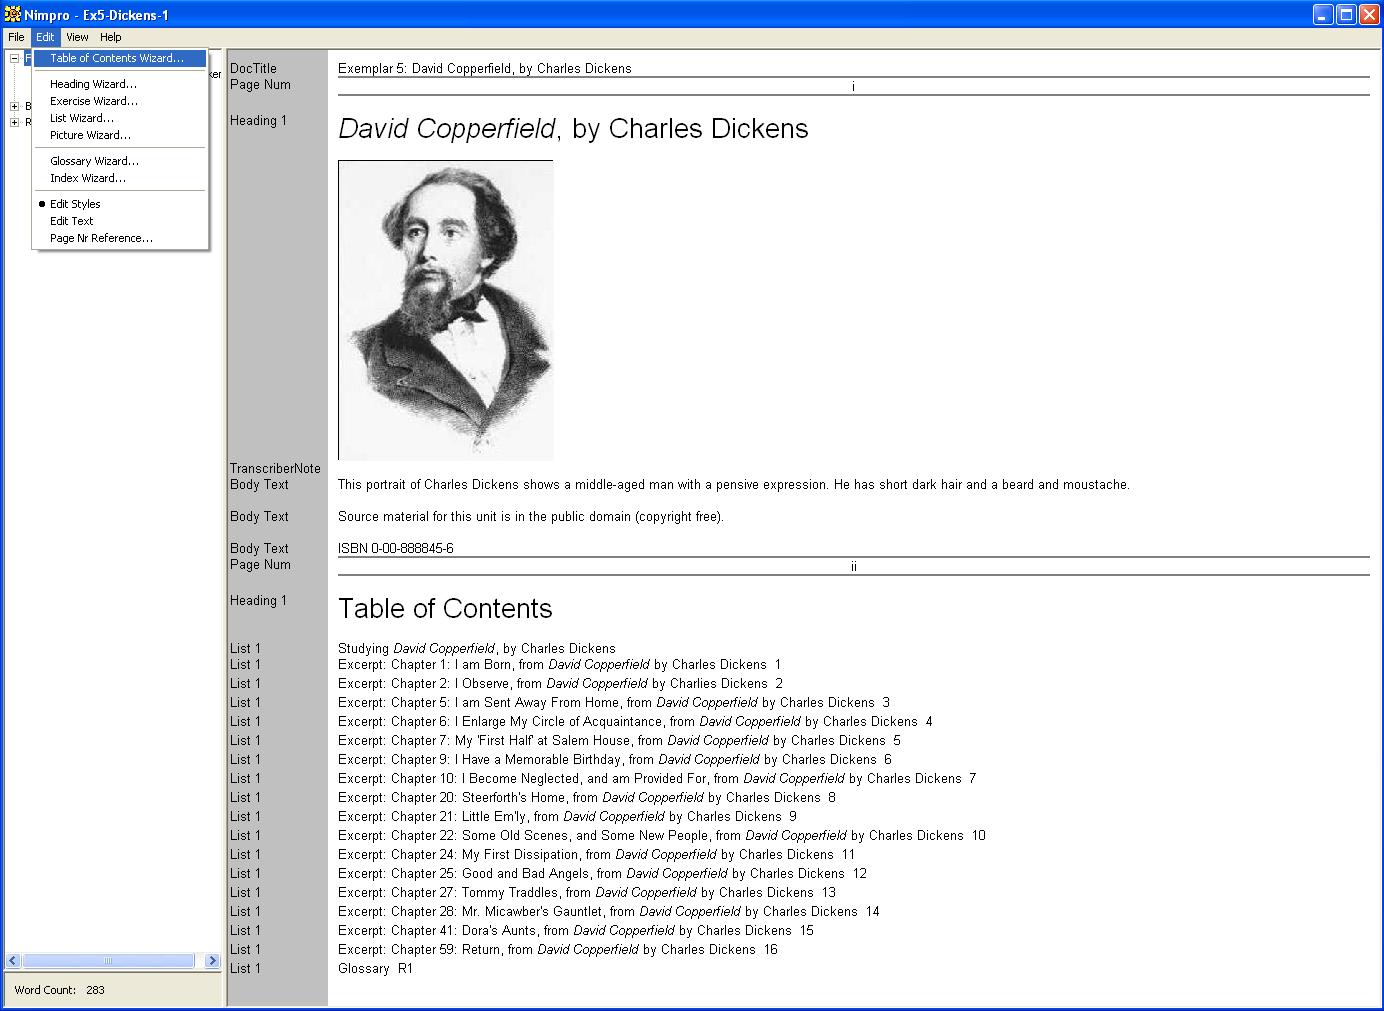
Working with Selected Text: the Table of Contents
In the screenshot below, first notice the open Edit Menu. You can see the user has "Edit Styles" selected as discussed above, but in this same menu, you can see the Wizards, such as the Table of Contents Wizard, that can apply similar style changes to the selected page or section more quickly.
The Table of Contents shown in this document is simple but quite typical. Each item in the table has the generic list style. For braille production, we want this table to have particular characteristics, so we use the Table of Contents Wizard to achieve the desired result.
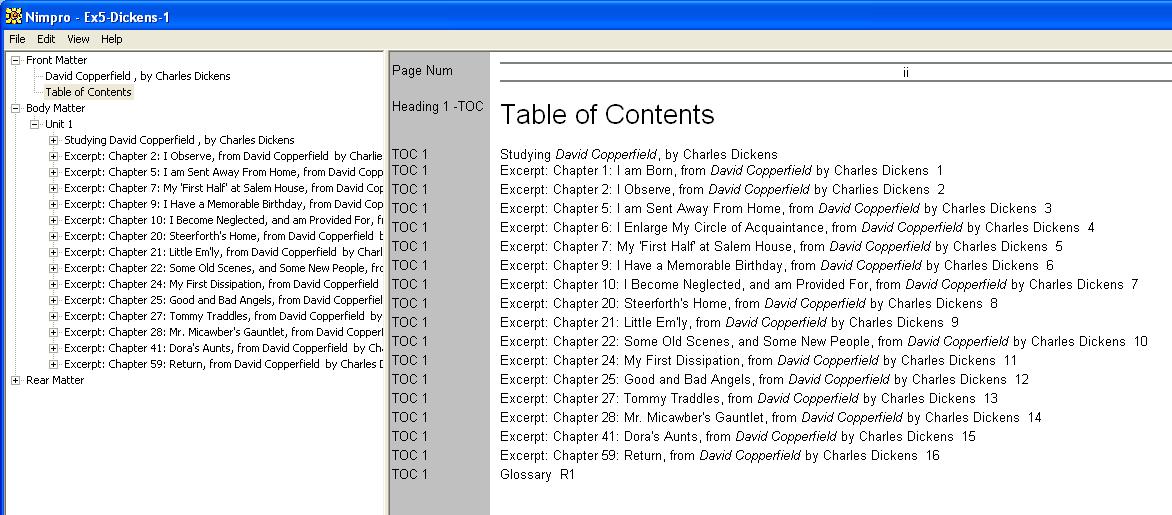
The following screen shows the open View menu, where you can see that the user has chosen to view the document "By Section." This made it easy for her to select only the specific section of the document that a wizard function should touch, in this instance, the Table of Contents.
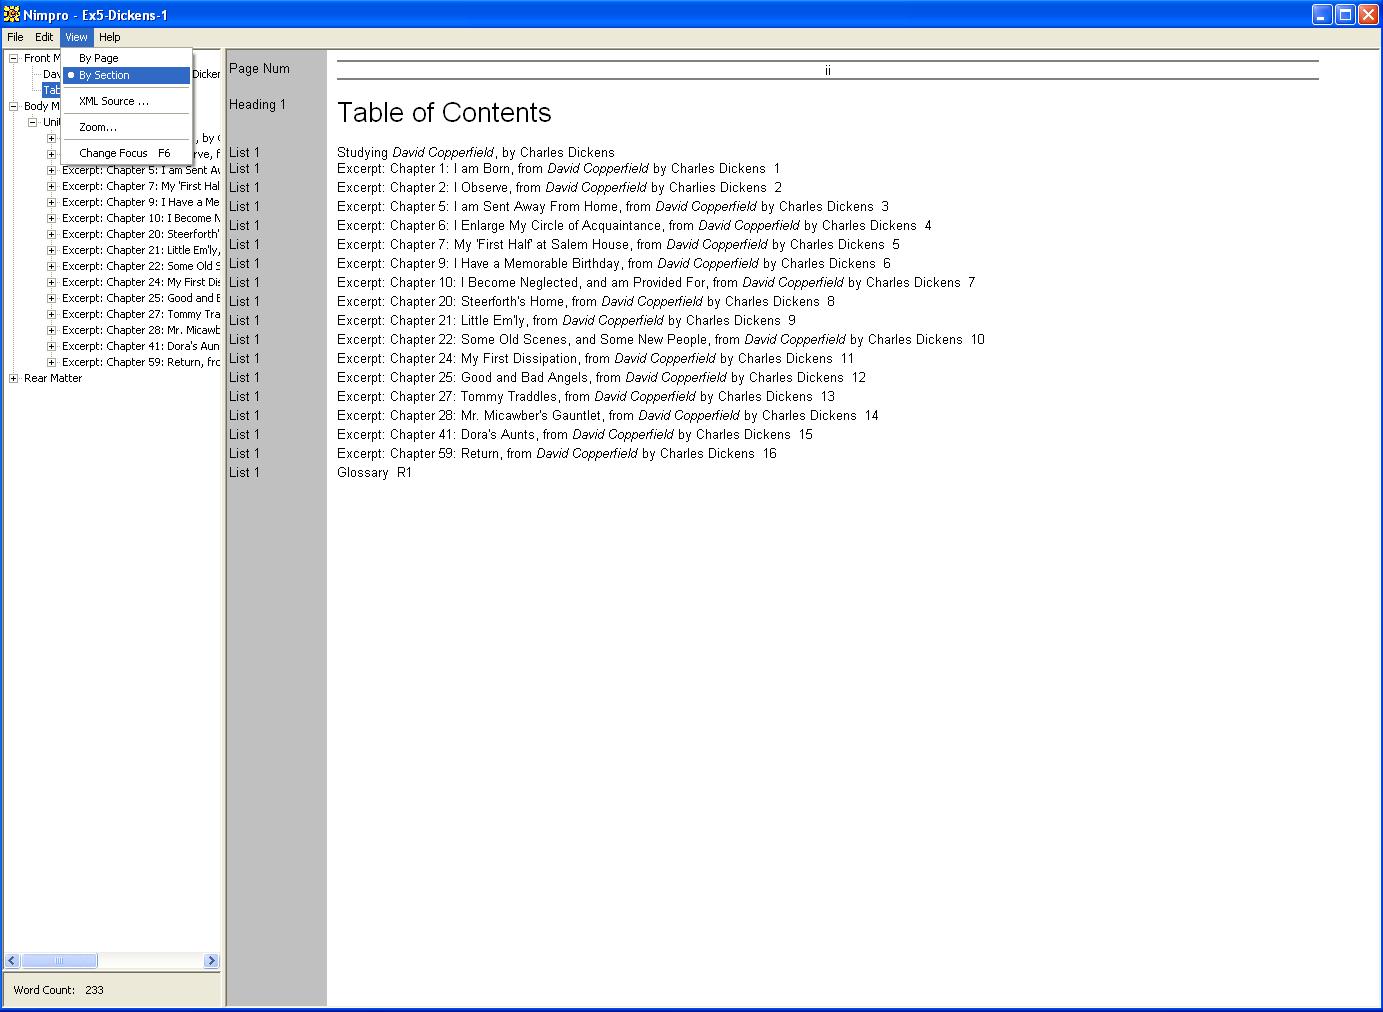
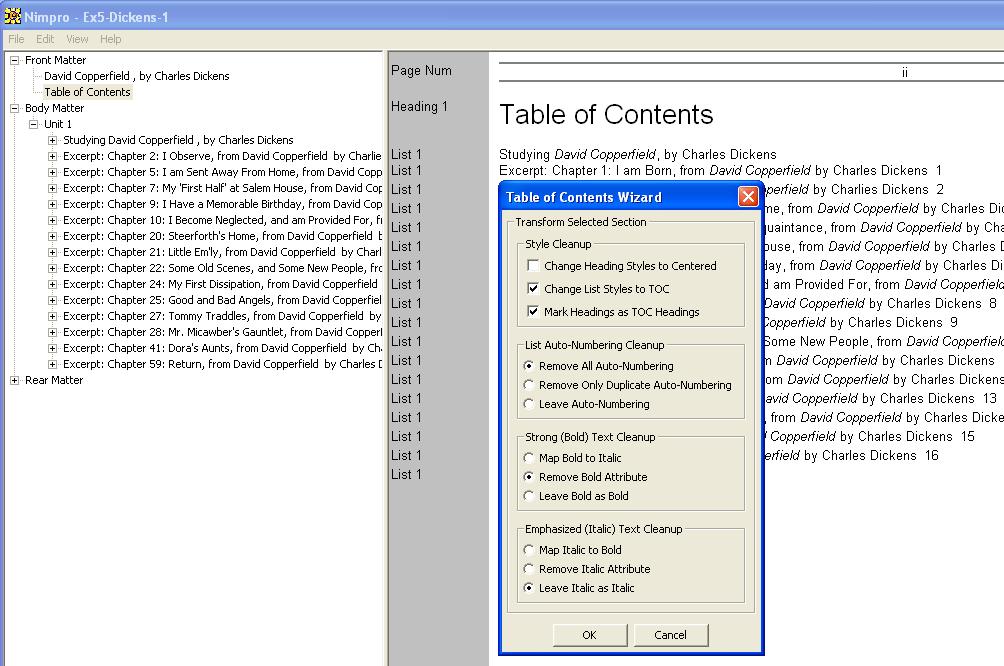
Table of Contents Wizard
The next image again shows the Table of Contents of David Copperfield with the Table of Contents (TOC) Wizard dialog open hovering over it. We notice that the styles displayed in the Style Map (the grey column) are the generic List style, and this is the main thing the TOC Wizard will change. The Wizard options allow the user to change the List style items to TOC items, center the TOC heading, mark the heading (for DBT) as a table of contents heading, and to do some optional stylistic cleanup on the TOC items as it goes. The Wizard can eliminate unnecessary bold and/or italic styling, and also make changes in the use of automatic list item numbering.
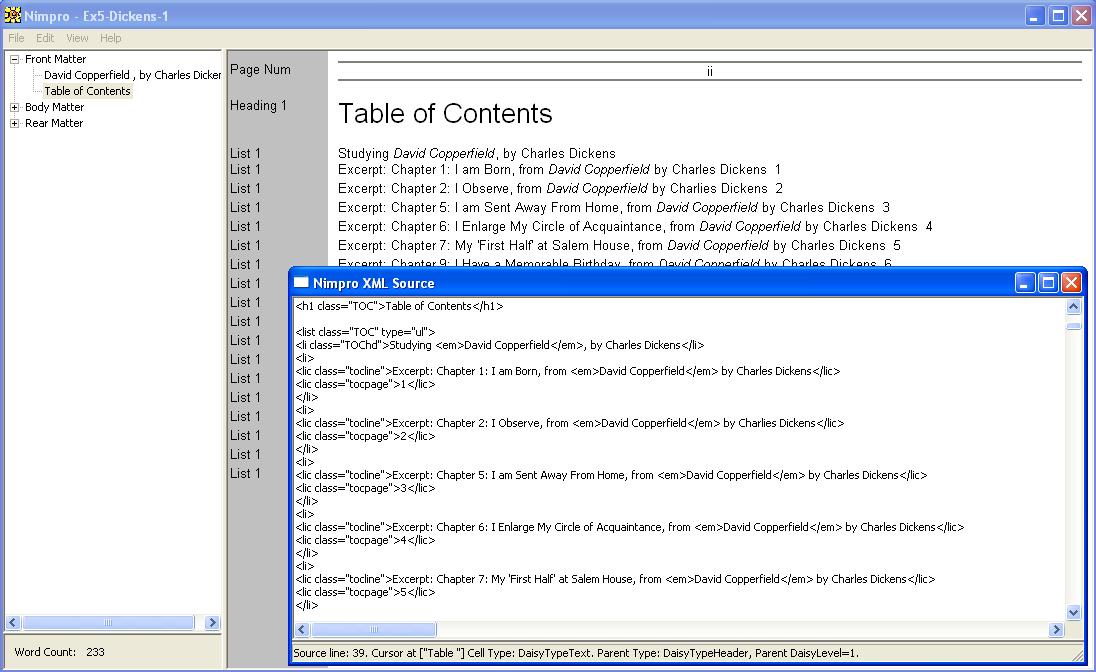
In the screenshot below, you see the one-click result of the TOC Wizard. The Table of Contents heading has been marked, and all the entries now have the specific TOC style for higher quality braille output.
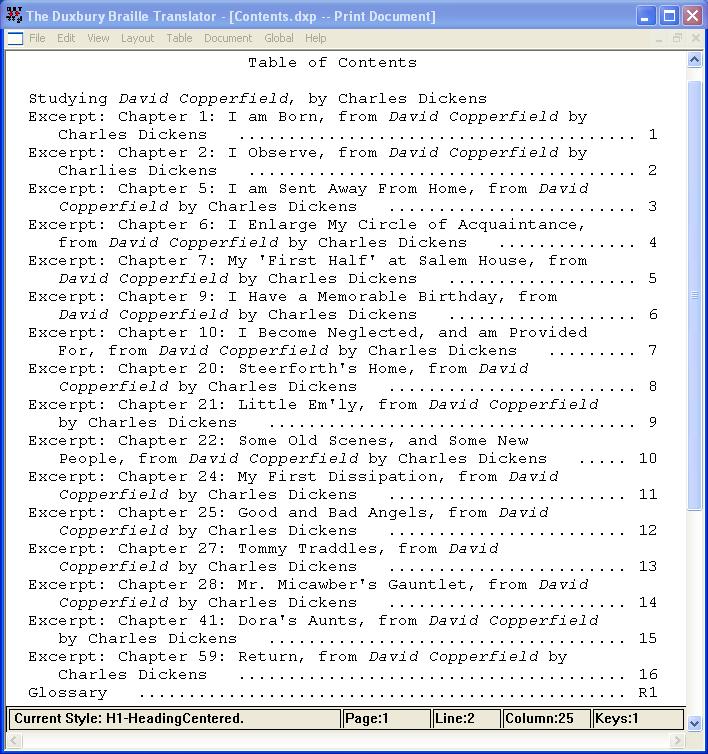
The next image is a departure. We have gone to DBT to show the Table of Contents as NimPro prepared it, e.g., with table of contents formatting and guide dots already correctly placed.
The XML Source Viewer
Back in NimPro again, the next image shows a feature which might be considered technical. The View Menu has a command to display the XML Source for the current document. The source text is displayed in a second view window showing the internal coding of the file. You may never need it, but it can illuminate otherwise mysterious document structure.
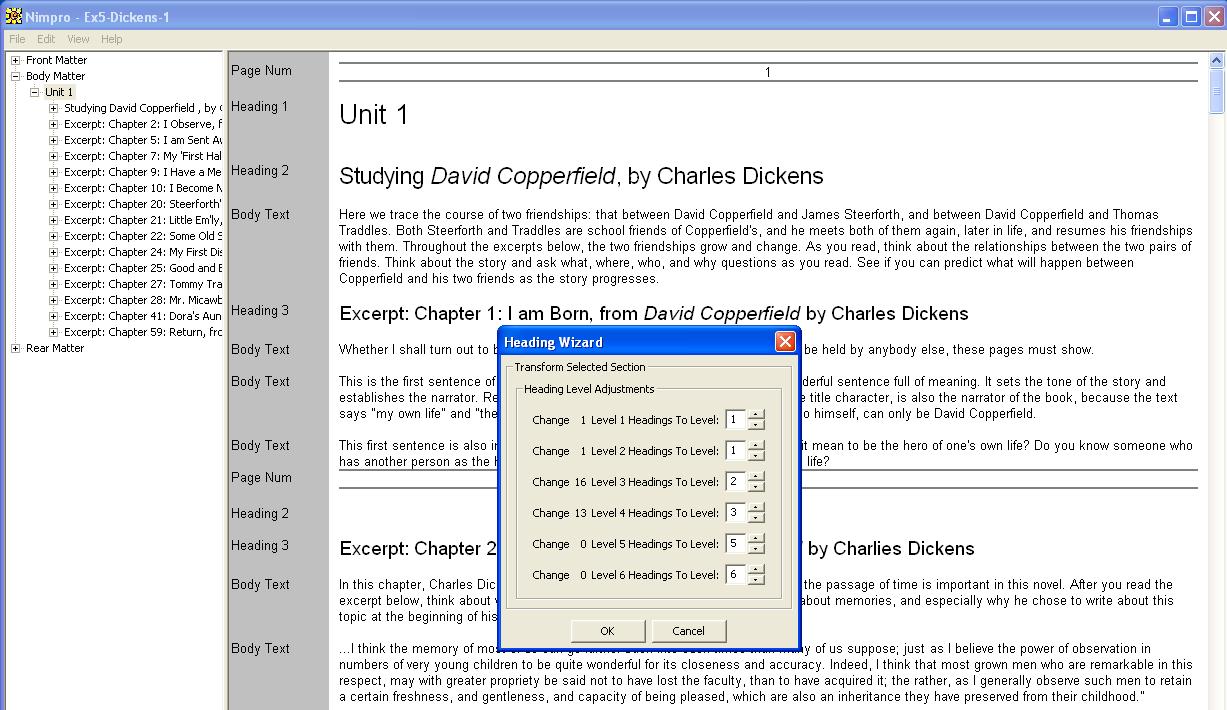
Headings Wizard
NIMAS documents are allowed to contain up to six levels of headings. Transcribers often need to reduce that for braille. In the Heading Wizard, the user can see which heading levels are currently used and then indicate which levels to change. As always, the wizard applies the user's changes to the currently selected pages or document sections.
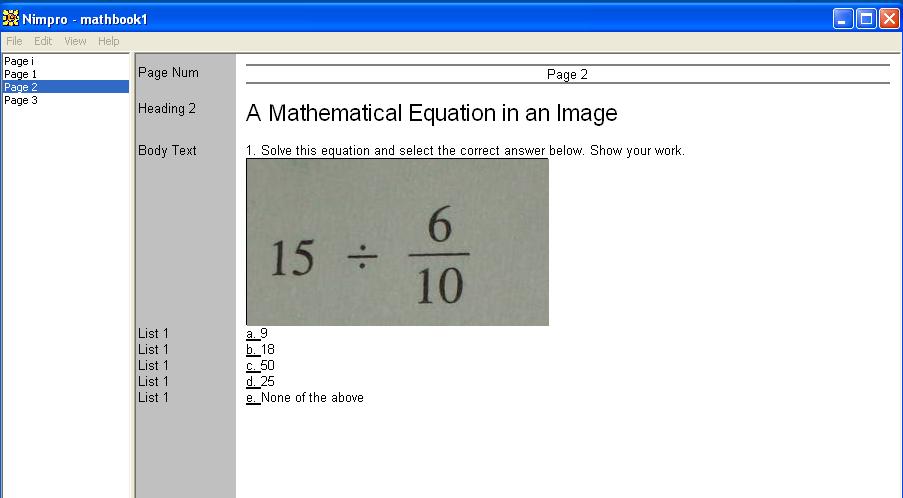
Math as an Image
As of version 2.0, NimPro parses and transforms MathML markup correctly for DBT to produce math braille. This is a big step forward in the braille production of Mathematics materials. Unfortunately, in some texts, math equations are still provided through images alone. This is the challenge to the braille producer described in this section.
NimPro has several alternative tools to use, to render such images correctly. In Nimpro, when one right clicks on an image, the following menu appears:
- Trace with QuickTac
- Replace with Text
- Replace with Braille
- Hide
- Export
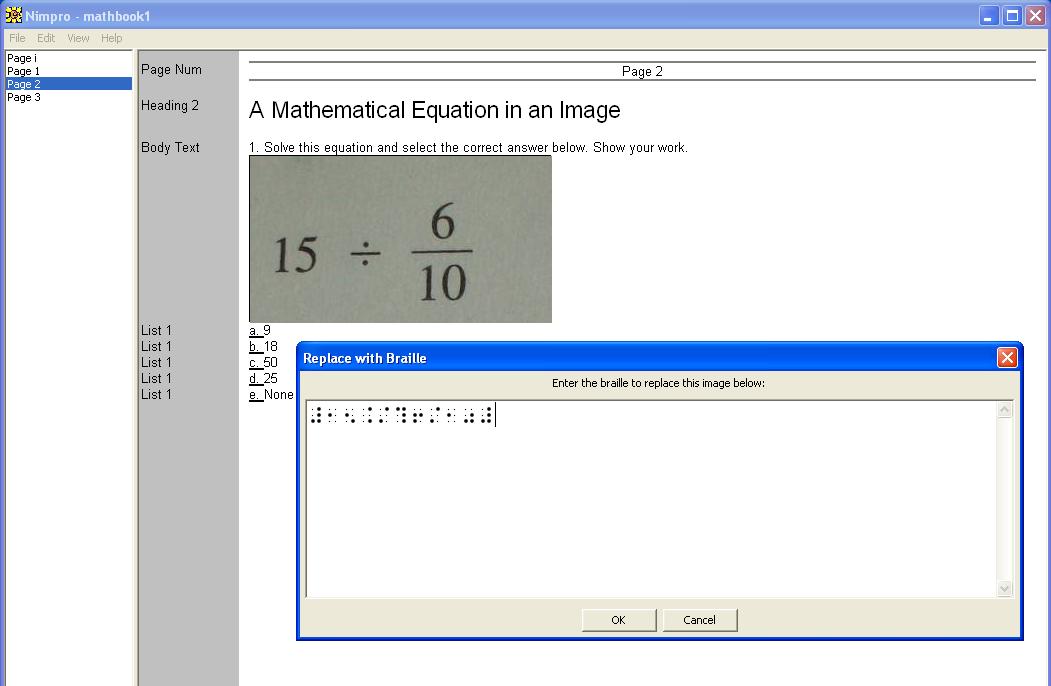
In this example, the user selects Replace with braille.
Selecting this option opens a window where one uses six keys as a braille keyboard.
When the user clicks OK, NimPro replaces the image and displays the braille for it instead. In the DBT file, this braille is retained as direct braille entry; and thus is produced cell for cell exactly in the final braille.
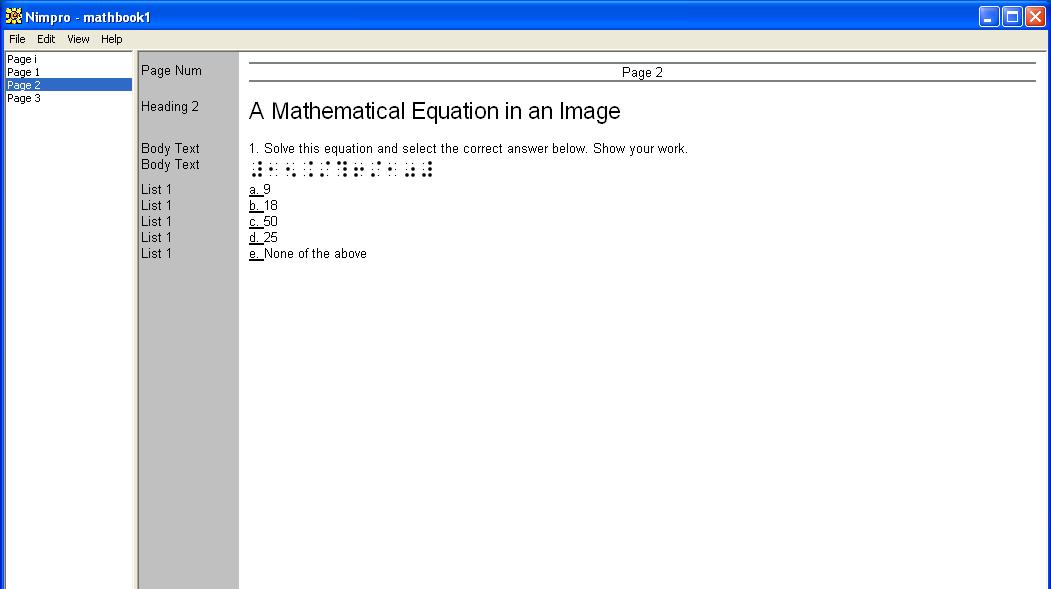
If, instead, the user had selected Replace with Text from the right click menu, then the newly entered text would be subject to braille translation in DBT.
If an entire math book were done this way using graphic images, it would be quite time consuming to have to braille in the material for each and every graphic, but it would be practical for shorter materials, and, if you had to do it, NimPro offers the most efficient way to perform this task. With NimPro, you can see where the images are, and you can refer to the image during the time you enter the text or the braille.
Using QuickTac
As discussed above, when you right click on an image, the image manipulation menu appears:
- Trace with QuickTac
- Replace with Text
- Replace with Braille
- Hide
- Export
In this case, the usr selects Trace with QuickTac to create a tactile graphic.
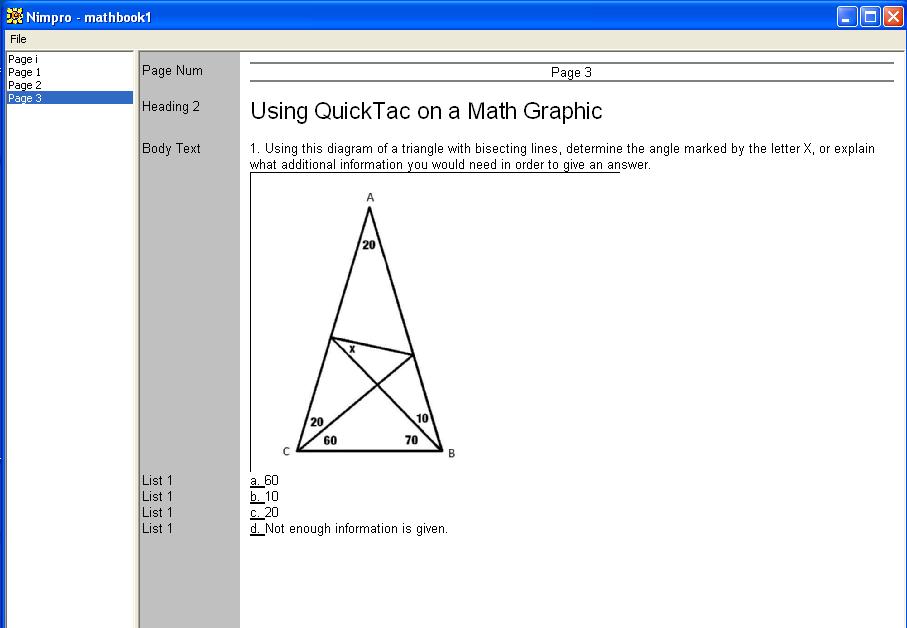
NimPro opens QuickTac and provides the selected image as a background for tracing.
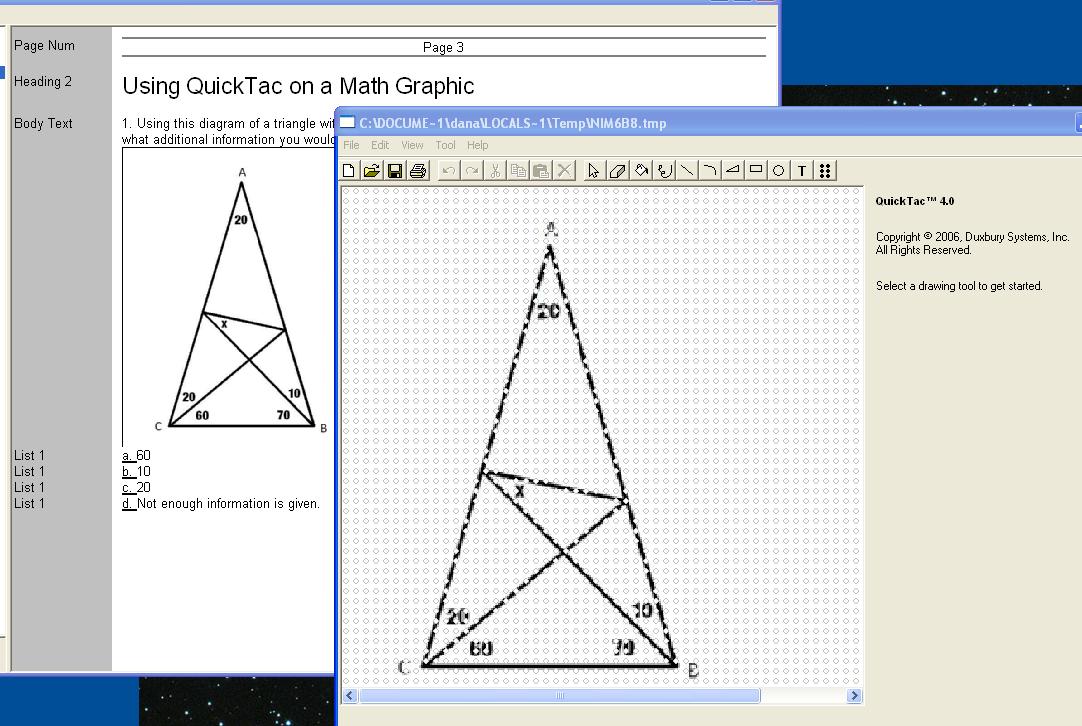
Here we see some of the operations of QuickTac to trace key lines and elements, and to apply labels to the tactile diagram.
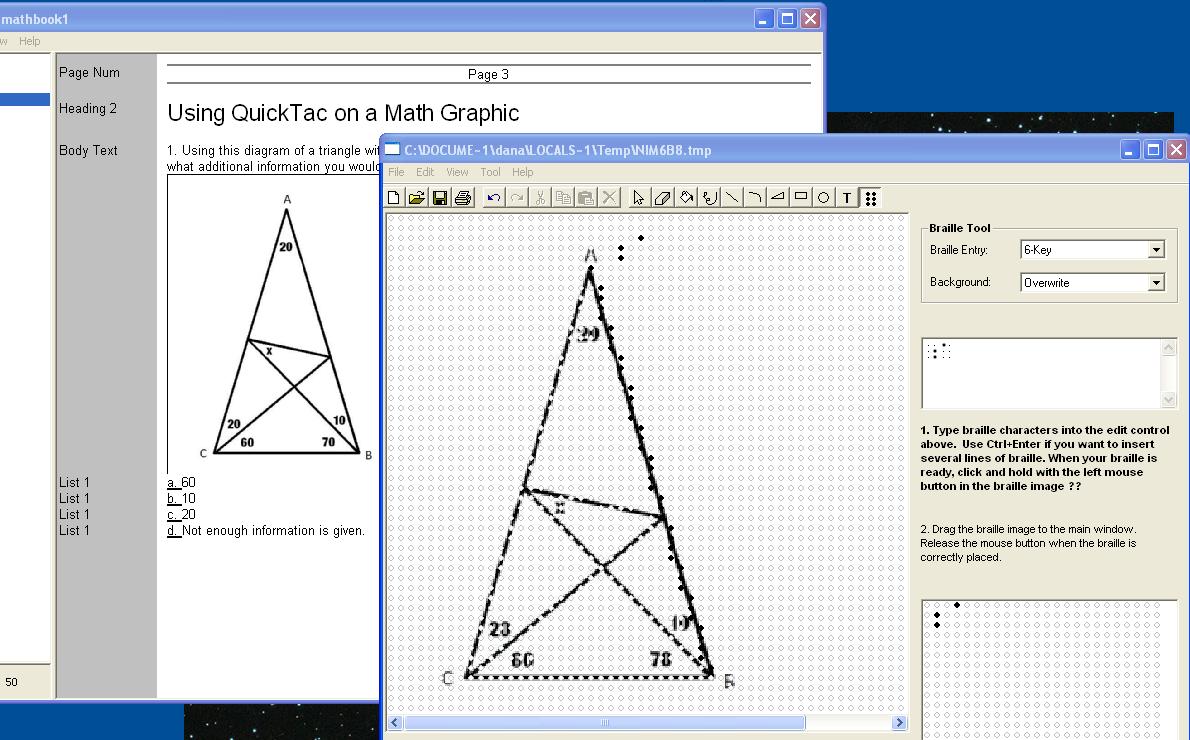
When you save your QuickTac work, NimPro captures it, and the resulting tactile graphic is inserted into the DBT file that NimPro writes. Note: the ability to produce tactile graphics from DBT (or any software) depends on the graphics capabilities of your embosser.
Copyright Duxbury Systems, Inc. Thursday, March 12, 2026